1955 Gibson TV finish: recreating that unique see-thru yellow
I've hit the big time! I'm workin' on a TV special!

The Gibson “TV finish” is one of my all-time favorites.
Introduced back in 1954, this pale yellowish finish was ideal for early black & white TV. On the tube, this guitar looked white, while an actual white guitar was way too reflective under the studio lights and would glow like radiation.

Some say the “TV” name also suited this finish because it looks like a TV from the 50s. Back then, this was a popular finish for furniture, too. Called Limed Mahogany in the Gibson catalogs, this finish went through some variations before it was discontinued in the mid-60s in favor of a brighter white.
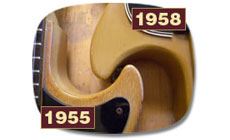
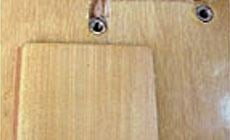
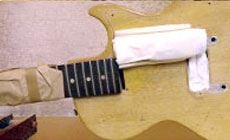
Shown below is a 1955 TV Model made in the first production year, and a 1958 Les Paul Special. The finish on the '55 is thinner, revealing more of the mahogany underneath. The style took on a more yellow tone from the late '50s into the '60s. This later, brighter yellow is what you usually see on recent Gibson reissues.
Let’s see what’s on this TV:
I’m doing a repair on the ’55 TV Model, fixing some damage next to this bridge stud bushing.
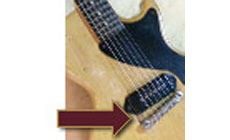
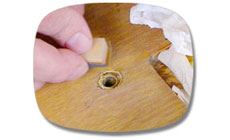
These bushings are pressed into the top and sit just below the surface. When the body is finished the lacquer covers them, too. I think someone trying to lower the guitar’s action screwed the tailpiece down until the pressure caused this wood between the bushing and the pickup to break out.
At least they didn't lose the chip of wood. They glued it back in, and you can see it in the photo above. That’s where this tale begins...
It’s a sad story:

The Good: The damage is only a small area, and it’s partially hidden by the bridge and pickup cover.
The Bad: This repair was poorly done.
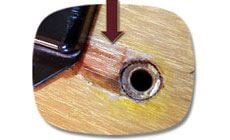
The Ugly: The bad repair was done with super glue. All the exposed wood is rock hard, and there’s a yellow halo appearing under the surrounding finish.
You can just see the yellow discoloration in that closeup above. Maybe the finish reacted to the super glue or the accelerator? Bummer. That repair should have been invisible, instead of needing a re-repair now. But hey, it's this kind of stuff that keeps us busy!
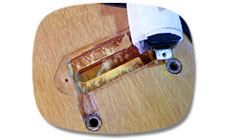
I moved the pickup out of the way and found something interesting. See that glob of white in the cavity? Looks like this finish was applied with a brush, then wiped off with a rag. Neat! That explains the patches of uneven color on the body: in some places the color is not as strong as others. I guess this was because it was ragged off more in some areas than in others. This unevenness works to my advantage: a patch of new finish will be hard to see.
Finding a filler.
I tried several options for matching Gibson’s white grain filler: thinned white pigment blended into lacquer, various color mixes, and even some old wood bleach I found in a crusty container.
The best results came from the simplest approach: ColorTone Grain Filler, which I mixed thin. I tested on scrap, spreading it on a piece of similar wood. It matched Gibson’s filler exactly!
Lacquer color tests.
I mixed colors to match the aged lacquer topcoats. After several trials on test boards, I found the color by using vintage amber and tobacco brown stain.
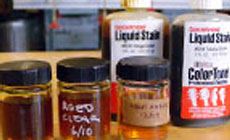
You can see my final test board above: it looks like the original!
Lights, camera, action!
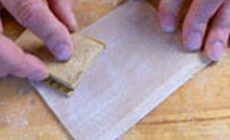
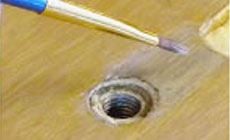
I started the repair by prepping the surface with 400-grit paper, carefully staying within the damaged area. The last thing I wanted was to sand out onto this old finish!
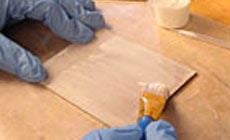
I then applied the grain filler slurry. Once it dried, I used my finger to wipe away the excess, then used a slightly damp brush to smooth it out, nice and even.
Building coats
I moved to the spray room to build lacquer coats to match the thickness of the old finish. I dialed in my airbrush for a thin spray and little pressure, hitting only the damaged area.
I didn't mask off around the repair, because the straight lines created by masking would be harder to level-sand into the top than a bit of overspray.
Here’s a tip: don’t leave the masking tape overnight.
Even the lowest tack tape can burn into a lacquer finish, so be safe and remove all tape when you’re done working for the day. It's a hassle, but re-taping the next day is easier than repairing damage caused by a tape’s adhesive.
Faking grain
After building a couple of thin coats I used an X-Acto knife to fake a few grain lines in the damaged area. The super glue on the previous repair had also filled all of the exposed grain rock-solid, leaving a smooth surface. I brushed filler into my scratched lines to match the surrounding filled grain lines. I let the filler dry, then used a damp brush again to remove the excess.

We all watched the Color TV
Back to the spray booth: it’s time to add a little color. After a few light passes, I felt I had the look. I asked my shopmates to come see (fresh eyes will see what I might not notice). We all agreed to call it good. All that was left to do was to build clear coats over the color, level the repair and polish it up!
Level sanding
When leveling this repair I started wet sanding with 1200 grit papers. Such fine paper takes a little more time to get the job done, but eliminates the need to chase out scratches left over coarser grits. I used a tiny wood scrap as a sanding block.
Sanding on any vintage finish is dangerous business, so approach it with care. To finish the job I switched to 3M polishing papers. I didn't use abrasive compounds. The polishing papers alone matched the surrounding finish.
Finishing touch
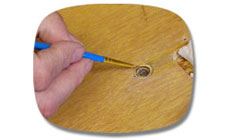
With the repair all polished up I went in for a final touch-up around the bushings themselves. Looking at the TV Special for reference, I filled the area around the bushings with grain filler, then brushed on some tinted lacquer to complete the look.
It’s showtime!
I finished this one up just in time for the owner to pick it up. He’s a happy camper, and he dropped off more finishing repairs, too!
Check it Out!
New closeout deals at stewmac.com!
Visit our new closeouts page. Don’t wait: closeout items will disappear fast!


