Jaws2 Fret Press Instructions
An overview of and instructions for using the Jaws2 Fret Press.
Jaws2 installs frets in slots that other fret presses can't reach:
Before the introduction of this tool, frets could be pressed into a neck from the nut to the body joint, but the remaining frets had to be hammered in. Now you can complete an entire fret job using fret-pressing rather than hammering.
Three wooden cauls are supplied: 1. The neck caul is curved and padded to fit the back of the neck 2. The soundhole caul is notched to fit over internal bracing when clamping the fretboard tongue 3. The blank caul is for customizing: you can notch it to match any bracing that the soundhole caul doesn't fit Jaws2 uses radiused brass inserts to match the curve of your fretboard.
The four nylon set screws on the tool remove the looseness inherent in bar clamps of this style, giving you control over the balance and pressure of the clamp as you work.
Even though Jaws2 has enough power to press a fret into a really tight fret slot, it's not a good idea to "power-in" the frets. If the slot isn't wide enough for the fretwire, excess force is likely to tip the fret over and mar the fretboard, or cause the neck to have excessive backbow. If your fretwire is too wide for the slot, you can widen the slot slightly with our Refret Saw or a Dremel with a small bit. Another option is to alter the fret tang by filing it with our Fret Barber #4363.
Use a small fine-cut file to slightly bevel the top edges of the fret slot. This helps to guide the fret tang into the slot. Start each end of the fretwire into the slot by lightly tapping each end with a lightweight hammer such as our Fretting Hammer #4895 or #1296. This leaves both your hands free and holds the fret upright so it won't tip sideways as it presses in.
Tighten the nylon set screws just enough to remove side-to-side play. The small set screw on the pressing shoe should be snug, but not so tight that the shoe spins when you tighten the clamp.
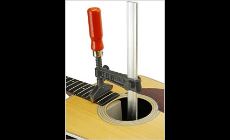
The notch in the soundhole caul straddles the upper-body brace on many guitars. If this doesn't fit the bracing on the guitar you're working on, you can modify the caul, or cut a notch in the blank caul to fit. With this arrangement, you can reach the highest-register frets above the neck.
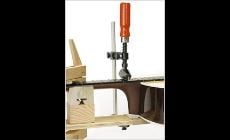
To work over the curved heel on an acoustic neck requires a simple setup to provide a clamping surface. A rigid piece of wood spans from the guitar back to the neck, with a block to support the padded neck caul (pictured). A single clamp holds this in place. Depending on the shape of your guitar's heel where it meets the body, you may need an angled shim for firm contact (we used this in our example). Use paper or cloth between the wood and the guitar back to protect the guitar's finish. With this in place, it's easy to press frets over the curved neck heel, and over the guitar's neck block area.
Match the fretwire to the slot
Prepare the slot
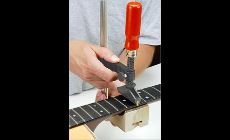
Start the fretwire
Snug up the set screws
Fretting along the neck
Fretting through the soundhole
Fretting over the neck heel