Dual Fret Scale Template Instructions
How to determine where to cut fret slots using the Dual Fret Scale Templates.
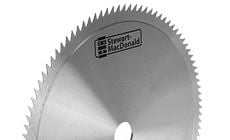
Our fret scale templates are designed for use with our #1557 Fret Slotting Table Saw Blade, and with our Fret Slotting Miter Box. For accuracy, your table saw's miter gauge should fit snugly into the table's slot, and slide smoothly without side-to-side play. Set the miter fence at exactly 90 degrees to the saw blade.
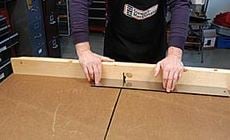
Make an auxiliary wooden fence that is straight and parallel, and fasten it to the face of the miter fence as illustrated. This wooden fence must be at least as long as the fingerboard you're slotting, and its center point should line up with the saw blade. Once attached, adjust the saw blade to the correct height for your fret slots, turn on the saw, and make a cut in the auxiliary fence.
Install the supplied 1/16"-diameter indexing pin into the fence, so that its distance above the saw table is equal to the thickness of the fingerboard plus 3/64". The pin should protrude from the fence 1/16" to 3/32". Don't locate the pin directly above the blade—offset it slightly to avoid cutting into it by accident (see illustration). You can offset the pin to the left or right of center, but make allowance for the offset when you attach the template to the fingerboard. Make sure there's enough wood on each end of the blank fingerboard before you make a cut.
Prior to slotting, true one or both edges of the blank fingerboard. Attach the fret scale template to the back of the fingerboard with double-stick tape. Choose one of the two scales, and be sure the notched edge you're using is flush to the trued edge of the fingerboard. The edges of the fingerboard and template together will rest against the miter fence.
To slot the board, engage the template notch on the indexing pin in the fence, with the fingerboard face down on the table. With the blade height adjusted to cut the desired fret slot depth, cut the slot all the way across. Lift the fingerboard and template away from the saw before you pull the fence back through the running saw blade. Advance the template, slot by slot, until you've cut all the fret slots. Note that the first slot on the template is the cutoff point for the fingerboard.
Remove the fret scale template from the fingerboard with a flexible, thin-bladed knife or scraper.
Optional Shooting Board: For the most accurate work, build a "shooting board," a sliding platform with a long fence and two guides fastened to the bottom that slide through both the right and left slots on the table-saw top. This makes for square, accurate cross-cutting. Bass, Baritone guitar, and Fender scale templates: After cutting all the slots, recut the first slot with the saw blade raised so that it will cut through the entire fingerboard. This is the peghead end of the fingerboard.

Using the template with a table saw

Using the template with our Fret Slotting Miter Box
Our Fret Slotting Miter Box is made for use with either of our fret saws: #5744 Fret Slotting Saw and #5755 Japanese Fret Saw. When used with our notched Fret Scale Templates, the Miter Box is a quick and easy way to cut slots for popular scale lengths. The sidewalls keep the saw square, and hold it snugly in alignment. The guide blocks on the sidewalls move up and down to adjust the saw's depth of cut.
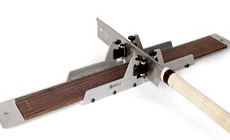
Fasten the template to the back of the fingerboard with double-sided tape. Set the saw depth by cutting into a waste portion at the end of the fingerboard, adjusting the guide blocks up or down until the depth of cut is satisfactory. With the template taped to the bottom, engage a template notch into the indexing pin on the fixed sidewall of the Miter Box. Set the two adjustable sidewalls so that the saw moves freely back and forth in the guide blocks, yet is held firmly without side-to-side play. Once these adjustments are completed, saw a fret slot, lift and move the template/fingerboard to the next notch, and saw the next slot. When all the slots are cut, separate the fingerboard from the template with a thin-bladed knife.
The Miter Box can also be used without the notched template. It's helpful to place a spacer under the fingerboard to replace the thickness of the template—this way you don't need to re-adjust the saw if your fingerboard stock is of uniform thickness. When using this setup for custom scale lengths, carefully mark the desired fret positions on the fingerboard and saw accurately on your marked lines.


