Dan Erlewine's Facebook fretless bass
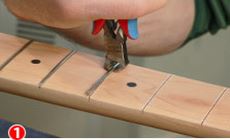
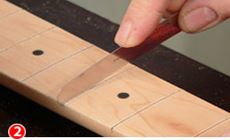
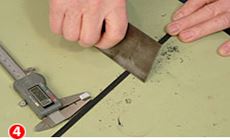
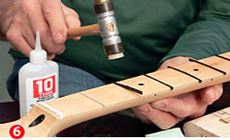
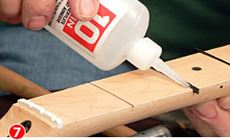
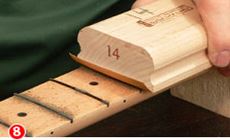
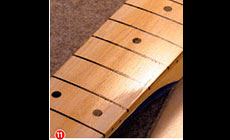
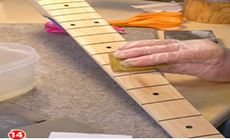
I’ve been having fun posting shop shots on our StewMac Facebook page, and that led to something new: you can go see big versions of these photos on Facebook! My friend Adam had two P-style basses, one pretty much like the other. To give him some variety I converted this one to fretless, removing the frets and filling their slots. I started by clamping the neck on blocks and pulling the peghead down to create a backbow (photo above). This opened the fret slots slightly, so my fret puller could coax the frets out without chipping the slots. Thanks to the backbow, the frets came out easily. I had a soldering iron ready to heat the frets and soften the glue under them, but I didn’t need it After unclamping the neck, a .024" feeler gauge fit snugly in the slots. And the binding I wanted to fit in there was .040" thick. So I widened the slots with a .031" diameter Dremel bit. The final result was a bit wider than the cutter bit: between .034" and .035". I used a scraper to thin the binding a little, removing about .003". That still left it a bit wider than the slots, which is what I wanted. The binding was 3/8" tall — wide enough to provide two usable strips when nipped in half lengthwise. I tapped the strips into the slots with my rough-cut edge up. The plastic bent to conform with the curve of the fretboard (a 14" radius). I ran water-thin super glue along both sides of each “fret,” letting it seep into the slots. I let it dry for 15 minutes. The excess plastic came off with a 14" radius block and 80-grit sandpaper. I stopped just shy of the surface to avoid scratches, and followed with 120, 220 and 320-grit papers until the plastic was smooth and flush with the fretboard surface. With the truss rod adjusting nut barely snug (applying hardly any tension to the neck), I checked the fretboard with a precision straightedge. The playing surface was perfectly straight from end to end, with a uniform 14" radius. The real test would be stringing the neck to pitch and seeing if it could be adjusted straight under tension:
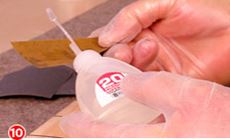
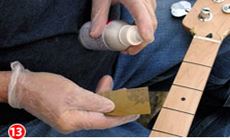
After cleaning the board with naphtha, it's ready for a clear finish. I used super glue as my finish; it’s clear and tough. I wiped the glue on with wet-or-dry sandpaper. (I don’t need to tell you it’s important to wear gloves, right!?) You can see where I missed a spot. That's OK, I wiped on lots of coats, and caught this on the next one. The weather was great, so I avoided the super glue fumes by working outside. I used #20 medium glue, sometimes mixing in some #10 thin to make it wetter and easier to apply. The coats dried fast: in five or ten minutes I could spray accelerator on the back of clean sandpaper and wipe the board with that — drying the finish completely. After 3 or 4 coats, I started lightly sanding between coats with 320-grit gold Fre-Cut sandpaper. After a few more coats I switched to 400, then 600, then 800-grit using a rubber sanding block. It started to rain, and I went indoors. (Which is sort of funny, since my next step was wet-sanding!) I wet-sanded with water and ever-finer grits up to 2000-grit micro-finishing paper, then followed with Micro-Mesh pads from 3200 to 12,000. After that I hand-buffed it with a soft rag and medium paste polishing compound. Adam’s using it in his recording studio. He says it’s like having a whole new bass!
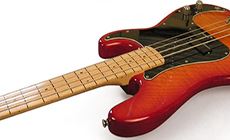
The result is a fretless bass with fret lines that help Adam play in tune — like a bicycle with training wheels!

It did! I lucked out!


And here’s the result: