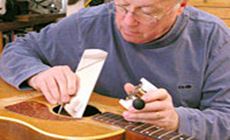
Workin' in the soundhole with the scissor jack and a mirror
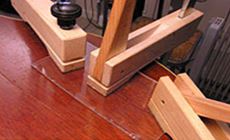
I'm coming up for air after gluing some braces. It’s cramped down there, and it’s hard to see anything... Working blind, with your arm stuck in the soundhole is a tough way to do good repair. But here’s some help: I use mirrors, magnets and scissor jacks to do a better job. You may need to look twice at this photo. It’s like two pictures in one. I’m looking through the soundhole, into an inspection mirror that’s reflecting the top braces. Somebody slopped epoxy all over these loose braces and everything around them. Even so, they still aren’t in good contact with the guitar top! (And this photo was taken after I'd already spent hours chiseling away epoxy. Whew.) The guy that did this probably had big arms and small patience. He couldn’t see what he was doing, and he didn’t have a good tool for pressing these braces into position for gluing. Also, I’d have used Titebond or hot hide glue here instead of epoxy. I sympathize with this unknown repairman. Trying to work by feel as the epoxy was hardening while the braces wouldn’t stay put, he freaked out! This job took ages, and instead of telling that story I’m going to show you how I’d avoid creating a mess like this in the first place. To prep for regluing, I made pairs of magnetic locating cauls. They're wood scraps with holes drilled to accept 1/2" repair magnets (glued, screwed or press-fit). One caul has northside-up magnets and the other has the opposite, so they attract each other. That's the tip of a magnet polarity tester in the photo below. The cauls clamp together magnetically, one inside the guitar mated to one on the outside. In the photo below, two sets of cauls are placed along the cleaned-up glue line to help me align a brace. Their magnetic partners are holding them in place from the outside. When the brace is wet with glue I can get it into the exact spot fast and without fumbling. Now work on the bridge saddle accurately, with the top arched the same way it will be under string tension. A three-piece inspection mirror shows what’s going on with the top braces. Slip the narrow pieces through the soundhole, then spread them out inside for a wide view. A scissor jack is a miniature version of the one in your car trunk. It collapses down low to fit a tight spot, then opens to deliver strong controllable pressure. Its flexible extension reaches through the soundhole, getting your arm out of the way so you can see the work. This badly glued guitar also had nasty cracks in the back. To glue these cracks flat and flush, a large area needed to be flattened under considerable pressure. I prepared a waxed 1/8"-thick white plastic caul and a pad of protective felt to spread gentle, even pressure over the crack from the inside. I’m holding a 1/4" thick acrylic caul with several wood blocks glued to it. This will also go inside, to span the top braces. Two of the blocks have repair magnets to hold the caul to the top. The cauls are shaped to fit into the curve of the guitars’ side. Even with all this careful prep, you gotta move fast when “wet glue time” comes: it took forty seconds to get all this in place. On the outside top and back, 1/8"-thick waxed acrylic keeps the two halves of the cracked surface level while cam clamps and camless clamps apply counter-pressure against the scissor jacks. How much pressure to use? Each job is different. It’s a matter of adjusting the jacks on the inside until it just feels right.Inside the guitar body

Workin’ down here in the soundhole ain’t easy!
Reaching inside a guitar, there’s not much room to work.
Can you figure out this photo?
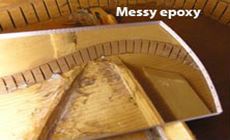
Boy, that’s an ugly glue job!

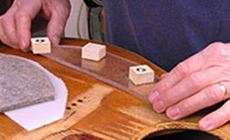
A better plan: make some magnet cauls
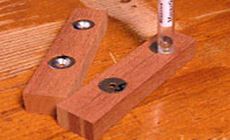

Check it out!

Tip: String tension without strings
Don’t fly blind: use a mirror

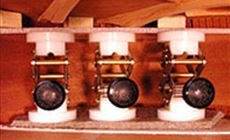
Scissor jacks

I use magnets on the jack in two ways:
Scissor Jacks aren't just for gluing braces