How to install a skin banjo head with Dan Levenson
Dan Levenson explains how to install an unmounted, skin banjo head.
Our thanks to Dan Levenson for helping to create these instructions. Dan's a renowned banjoist, singer, author, folklorist, and Banjo Newsletter columnist. Dan's first experience with installing a skin head on his banjo was the test for these instructions. Dan says "It's a little more difficult than installing a regular plastic head, and it's certainly wetter!" Soak the skin underwater in the dishpan. If it floats, weigh it down using jars of water. Twenty or thirty minutes is enough to soften the skin; disassemble the banjo while you wait. Remove the neck from the banjo rim. This will mean removing the metal rim rods or the dowel stick that support the neck. Check that all the L-Shoe brackets are tight, and their bracket holes are squarely aligned. Remove the tailpiece from the rim (noting how to put it back on later). Next, loosen the bracket hook nuts enough to remove the tension hoop, but don't remove the nuts completely — they will be needed to install the skin head. Lift off the tension hoop and remove the head, exposing the tone ring. (Many traditional banjos have no tone ring; in these, the top of the rim is the tone ring.) At this point you have a headless rim with bracket hooks and hex nuts jangling from the L-shoe brackets. To make the installation easy, fasten a temporary dowel-stick of scrap wood inside the rim. Fasten this to a chunk of wood, and clamp it to your workbench. Remove the softened skin from the water, and loosely roll it in a bath towel to blot off excess water. A flesh hoop is a wire ring that fits around the banjo rim. If your banjo previously had a plastic head, it doesn't have a flesh hoop. You can make one out of heavy-gauge wire, such as a coat hanger. Where the two ends of the hoop meet, wrap the joint with tape. The hoop should be a little larger than the rim — about the same circumference as the tension hoop. Lay the skin over the pot and tone ring, leaving an equal amount of excess skin hanging over the edge all around. Place the flesh hoop on top of the skin. Lift the edge of the skin up, and fold it over the flesh hoop towards the center of the rim. If you clip clothespins to the skin as you fold it in, their weight will keep the skin folded in toward the center, making the next step easier. Lay the tension hoop onto the skin. If there's a neck cutout, align it with the neck side of the rim. With the tension hoop resting lightly on the skin, gently pull on the edges to remove the wrinkles. At this point, you just want to stretch it tight enough to smooth it, but not so tight that you can't press the tension ring and flesh hoop downward. This is the hard part! You need to get 6 or 8 bracket hooks over the tension hoop with just enough tension to hold the assembly together — but not so much that you pinch the skin. Install two hooks at the neck joint end, two at the tailpiece end, and one or two on each side (at the 3 and 9 o'clock positions). Keep an eye on the skin as it pulls under and through the tension hoop, pulling it through equally all the way around. Once these are in place, you should still be able to stretch the skin tighter by tightening the bracket hooks. As you work, remove all of the wrinkles around the flesh hoop and the top edge of the rim. How much to stretch it depends on how tight you want the head to be when it dries. Some prefer to stretch it nearly as tight as possible, while others prefer snug but not tight. You'll need to determine your preferences through this experience. Keep in mind that the skin will shrink as it dries, making it tighter. If it's too tight when wet, it won't pull down far enough under tension and could break as it dries. If it's too loose, the tension hoop will bottom out before fully tightening, and the skin won't have enough tension for playability. Every piece of skin is different and all are affected by the weather and humidity, so follow your instincts. If necessary, you can remove the skin, re-wet it, and reinstall it. Once you're satisfied with the position of the tension hoop, attach the rest of the hooks and make all the nuts finger-tight. At this point you should still be able to stretch the skin a bit, although it's becoming more difficult. After a final check of the alignment of the tension hoop to the brackets and hooks, tighten the head down. Follow a "star" pattern in tightening: start tightening at the neck area which is the 12 o'clock position, then tighten at 6, 3, and 9 o'clock. Then start the pattern again at the hook next to 12 o'clock, etc., until all of the nuts have been seated. When tightening with the wrench, less is better. For the first couple trips around the rim, use a half-turn of the bracket wrench (180°). As the hoop comes down and the head begins to stretch, switch to quarter-turns (90°). Turn each nut the same amount, a little at a time, and follow your star pattern. Check often to see that the tension hoop is coming down evenly. If you find that the tension hoop is uneven, adjust it by tightening the high side and loosening the low side. Checking by eye works, or you can measure from a fixed point: use the underside of the flesh hoop as a reference, and see that the head measures the same distance from the rim bottom all the way around. Stop tightening when about 1/3 of the tension hoop is below the top of the tone ring. (If more than half of the tension hoop is below the top of the rim, that's too tight for this point.) Allow the skin to dry at this point. The head will dry fairly quickly, but you also want to dry the areas covered by the tension hoop, so letting it dry overnight is best. The final step is cutting off the excess skin from the banjo pot. This can be done while the skin is either wet or dry, but if this is your first time installing a head, wait and trim it later so you have the option of rewetting and reinstalling. Carefully cut away the excess skin to the top of the tension hoop with an X-acto knife or single-edged razor blade. The skin will be easiest to trim when it's partially dry — when it's leathery but not brittle. After cutting it level with the top of the tension hoop, it will shrink to just the right level. Once the head is completely dry, you can attach the neck and string the banjo back up to see how it sounds and feels. If the bridge is dishing into the head and the strings buzz no matter where you play, the head is too loose — tighten it following the star pattern you used before. If it feels too tight or sounds too bright, loosen it the same way until it feels and sounds the way you want it to. If the tension hoop bottoms out into the neck joint, you'll need to re-stretch the head, making it a bit tighter this time. To do this, remove the head and soak it with the flesh hoop attached. Don't remove the flesh hoop, but the skin is done soaking when it's soft enough that you could peel away the hoop if you wanted to. Place the head back on the banjo and pull the skin a bit tighter, then reinstall the tension hoop, using the same bit-by-bit tightening approach. Sometimes it takes a time or two before you find the tension that works for you. Once the head has dried to the right tension, you're ready to string up and play!
Tools and items needed
Wet the skin
Remove the neck
Tighten the L-Shoe brackets
Remove the old head
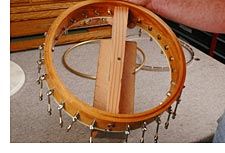
Make a support stand
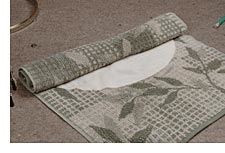
Lightly dry the wet head
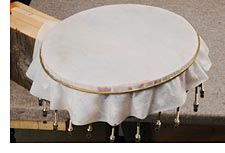
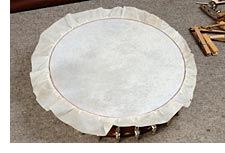
Using a flesh hoop
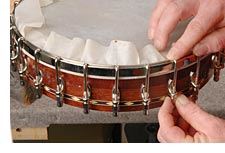
Lightly position the tension hoop
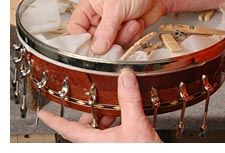
Install a few bracket hooks
Tighten the head

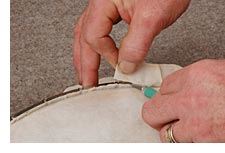
Trim the head
Try it out

