Banjo Killer? The scoop on forward X bracing for greater guitar volume.
How I make a Banjo Killer with forward X bracing

The Banjo Cat was really loud. The Bassist said, "My word!" But thanks to forward bracing, my dreadnought could be heard!
Banjos are loud!
I build them, and I love to play them, but in a bluegrass band their volume is tough for a guitar to compete with. That's why I build my Sams Guitars to be Banjo Killers: using forward X bracing to make them louder.
Here's the story:
In mid-1938 Martin relocated their X braces, moving them back away from the soundhole by about half an inch. This reduced problems with warping behind the bridge, because it stiffened the top — but it lowered the volume of the guitars.
Many builders today, myself included, prefer the original “forward” X bracing. I recommend it for players who will be playing in a group. Here’s how to lay out forward X bracing on our Dreadnought Guitar Kit.
The gray areas show typical modern bracing, and the white shows the forward X bracing. The center of the X joint moves closer to the soundhole, but you can see that it’s not as simple as just sliding everything forward 1/2".
The “popsicle stick” brace wasn’t used in the early 1930s, and isn’t used here.
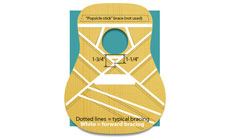
The X braces are at a slightly different angle, changing from 98° to 100°.

The gap between the soundhole to the front edge of the X joint, (not the centerpoint of the joint) becomes 1".

How to do it:
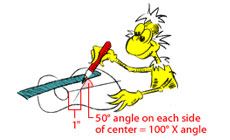
- Make a mark on the centerline 1" below the soundhole.
- From this mark, draw lines at a 50° angle into the lower body bout areas. With a straightedge, extend these lines onto the upper body. (The two lines at 50° angles to the left and right of center create the 100° X angle.
- Add a parallel line 5/16" below each line. Your X braces are glued in the 5/16" space between these parallel lines.
- The four small “finger” braces will keep their relationship to the X braces, just moving forward along with them by 1/2".
- The two long tone bars still tuck into the X brace at the same location as before, but now they run toward the bass side at a 120° angle.

The shoulder brace above the soundhole stays in the same location.
The bridge plate stays in the same place, but it becomes a little longer to meet the wider X brace angle. The flat “popsicle” brace is not used on the forward X braced guitars.
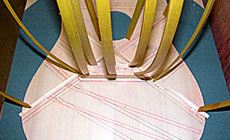
Here, the X braces and bridge plate are glued up and braced on my go-bar deck. For this photo, I marked the typical brace positions in black, and my forward positioning in red.
We manufacture our Guitar Kits right here in our own shop, so the parts are top quality and everything fits.

Dan Erlewine and I made a how-to-build DVD that comes with the kit.


