Self-adhesive Sanding Disc
Instructions for using a Self-adhesive Sanding Disc with a Concave Radius Dish.
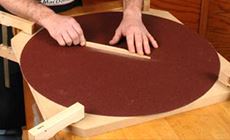
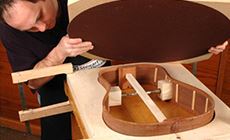
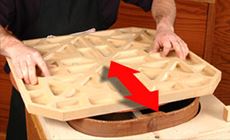
Before attaching the self-adhesive sandpaper disc to the radius dish or flat board, we recommend that you apply a thin protective coat of sealer (example: Aerosol Sanding Sealer). This creates a barrier between the wood fibers and the adhesive that will prevent pulling up fibers or flakes if you ever need to remove the adhesive disc later. Make sure the sealed surface is clean and dry, peel off the backing and place evenly on the dish. Press firmly on the surface of the disc. A rubber faced hammer is helpful in making the disc adhere well. Use it to pound the disc out in the middle where it is hard to apply pressure. The disc can be left on the dish when gluing braces and actually helps to keep the top and back from slipping while applying go bars. To remove the sanding disc use a hair dryer or heat gun to warm the disc and help release the adhesive from the dish. Vacuum dust from the disc surface and to extend cutting life. To successfully sand guitar linings you need to have the guitar body in a rigid form (both inside and outside forms work well). Attach the form to a solid surface. Using a pencil, mark the tops of the linings and the neck and tail blocks to be sanded. The pencil marks will show you your sanding progress. With your sanding disc attached to a radiused dish (or flat board for flattop instruments), sand with the length of the body using short strokes of an inch or two, holding the dish on the sides and applying a slight downward pressure. Smaller bodied instruments like mandolins and ukuleles can be held in a solid inner form and moved back and forth on top of the sanding disc (or flat board) clamped to a table. Check frequently for progress and apply pressure evenly to the bass and treble side. Check the height of the sides in several places on both sides (be sure to compare like areas side to side as most guitars change in height from the neck block to the tail block), if one side is higher than the other, apply a little more pressure to the high side as you sand until the sides are even. Check your work frequently. Cut your brace wood to the approximate radius then mark the radius side of the brace with a pencil. Sand to the final radius by moving the brace evenly back and forth until the pencil marks disappear. Installation and removal
Tech Tip
Sanding kerfed linings
Shaping braces