Neat trick for peghead binding (tiger inlay)
Issue 227 October 09, 2014
Dan Erlewine’s building a guitar for a tattoo artist. It’s solid black walnut, with a fancy peghead inlay: a tiger image drawn by the customer.
In this Trade Secret, Dan tells about that inlay and shares a neat trick for exactly sizing the binding that goes around the peghead.
About the guitar in this video: Dan’s making this V-body guitar out of the very same black walnut tree that produced bluesman Albert King’s "Lucy" guitar in the 1970s.
- The customer is a tattoo artist who designed the pearl tiger inlay
- A fingerboard leveling file does double duty for resizing binding
- Unusual CNC-based approach to creating a bound peghead
- Quick jig: a filing fence
Video Transcription
[on-screen text reads: Dan Erlewine - Stewart-MacDonald]
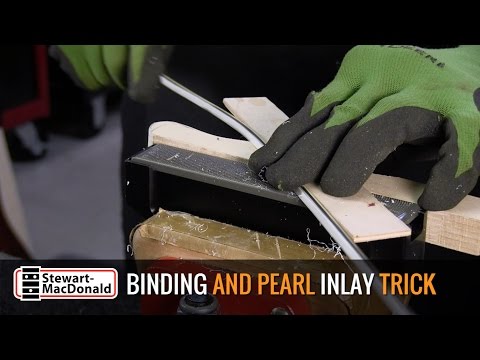
Dan Erlewine: Our Snapfile was designed for fret work and it's got four different file teeth that'll do that. For beveling fret ends or leveling frets. Leveling curl with this coarse razor cut. And I love this one and I have a use for it that has nothing to do with fret work and I'm going to show you [on-screen text reads: Snapfile Leveling System from StewMac - Versatile 4-in-1 filing]. It's pretty cool.
Using the Snapfile for resizing binding
I clamp it into my repair device and use it like a little joiner to clean up plastic bindings that I just made for a peghead job I'm doing. This is what binding looks like after it's glued and runs through the laminator [on-screen text reads: Binding Laminator]. And these strips were sized on the MacRostie Binding jig [on-screen text reads: McRostie Binding Trimmer] first. I sized it to fit the body, but now I'm going to shave some down smaller to bind the peghead really easily and it's very controllable. If I pull it straight across these teeth, they're cut on a circular, sharp pattern and it removes that glue in a second.
And I'm also making the bottom 90 degrees. If you pull it across at a sharp angle, it takes more plastic off in a different way, depending what side you pull from. So here's a little tip. I made this little jig of wood that helps me guide it across at an angle. And you want to wear gloves when you do this because you can burn your fingers.
CNC-based approach to creating a bound peghead
Here's something that you might not have seen before. It looks like a jig for gluing and binding, but it's actually going to be the peghead overlay with the binding already in it and an inlay [on-screen text reads: Binding and Trim at StewMac - Find the binding you need]. And I cut away the excess and it's ready to glue onto the peghead. What I'm doing is fitting this binding down into this groove on a peghead overlay I'm making, and I'll have to take a few thousandths off of it. Plus I want to square up the bottom and get rid of all that grunge. Yeah, that's more like it. It doesn't take much.
I'm making this guitar black walnut. What I'm showing you here is how I went about making this peghead overlay on a guitar that I am making for a customer that's a tattoo artist. And he drew the tiger and gave me the picture and Don MacRostie put it into a CNC machine and cut all the pearl and then engraved it. And he also cut all the channels that you see so I can come in with my binding and just glue it into the slots, then cut away the excess. And I have a beautiful peghead overlay.


