Installing side dots with the help of plywood scraps
Hang onto plywood scraps for jigs and jobs like this! (could be a repair, or a new build), install the side dot fret markers before the binding goes on the neck. It’s mighty hard to drill perfectly aligned holes while wrangling an entire neck, but it’s easy when the binding is still a flat strip of plastic or wood. I’ll show you how. And these tips will work on a little benchtop version just as they do on my full-size drill press. Here’s the first tip: Reuse. Plywood scraps come in handy in lots of ways! Drill press tables have an open center for the drill to pass through. When the bit punches through the workpiece, it pushes out ragged splinters of wood (shown in the photo below). If you lay the work on plywood, as the bit cuts through it continues into the backer board and you get no punchout! The left hole in the same photo was drilled using a plywood backer. It keeps small cut-offs from falling through the blade guard and jamming the works when you’re making tiny cuts, like shaping these fret end nibs in Gibson-style binding. A bonus with plywood is that you can glue things to it. Using super glue and accelerator, I’ve fastened a scrap of black binding to the table as an instant fence. Now I can line up the white binding under my drill and slide it left or right as I drill. Here I'm just lining up the fence, using a fine-pointed awl instead of a drill bit for pinpoint accuracy. (This is the awl tip that comes in our screwdriver set.) When I've got things positioned, I'll clamp down the plywood so the fence doesn’t move and substitute the drill-bit for the awl. The marks from the awl give the drill bit something to center on, and these holes go in fast and accurately. With the binding resting on foil or wax paper, press the plastic side dot rod into each hole and flush-cut it with your fret cutter. Touch it with a drop of water-thin #10 super glue, which will wick down into the drilled hole and be dry in seconds. (Gibson side dots use 3/32" diameter rod.) Flush the dots to the binding with a scraper or file. A 6" fingerboard leveler clamped in your vise is good. Pull the binding against the cut of the file’s teeth. Here I’m using our new super-sharp Snapfile. The chemically machined teeth are sharp as the dickens — the results are like running the plastic over a jointer! With the side dots flushed, the binding can be installed. This will be a Gibson style fret job with plastic binding nibs at the fret ends. I roughed in these shapes on the band saw (using a plywood scrap!), and now I can file the between-fret sections level with the board. I’ve got my side dots, and I’m good to go!Installing side dots

When you’re putting binding on a fingerboard
I’m going to use a drill press for this technique.
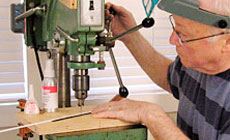
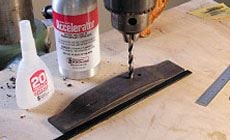
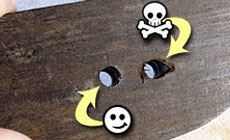
Plywood helps you drill clean holes when you clamp a scrap of it to the drill press table as a disposable drilling surface.
I use the same scrap of plywood on my band saw:

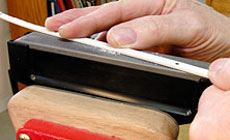
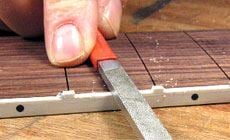
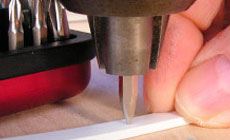
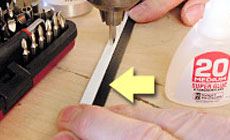
Fast fence for aligning the side dots:
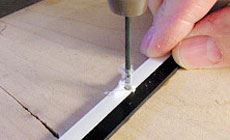


Installing the dots is easy: