How to sharpen a scraper
How to burnish and sharpen a scraper.
I-3416
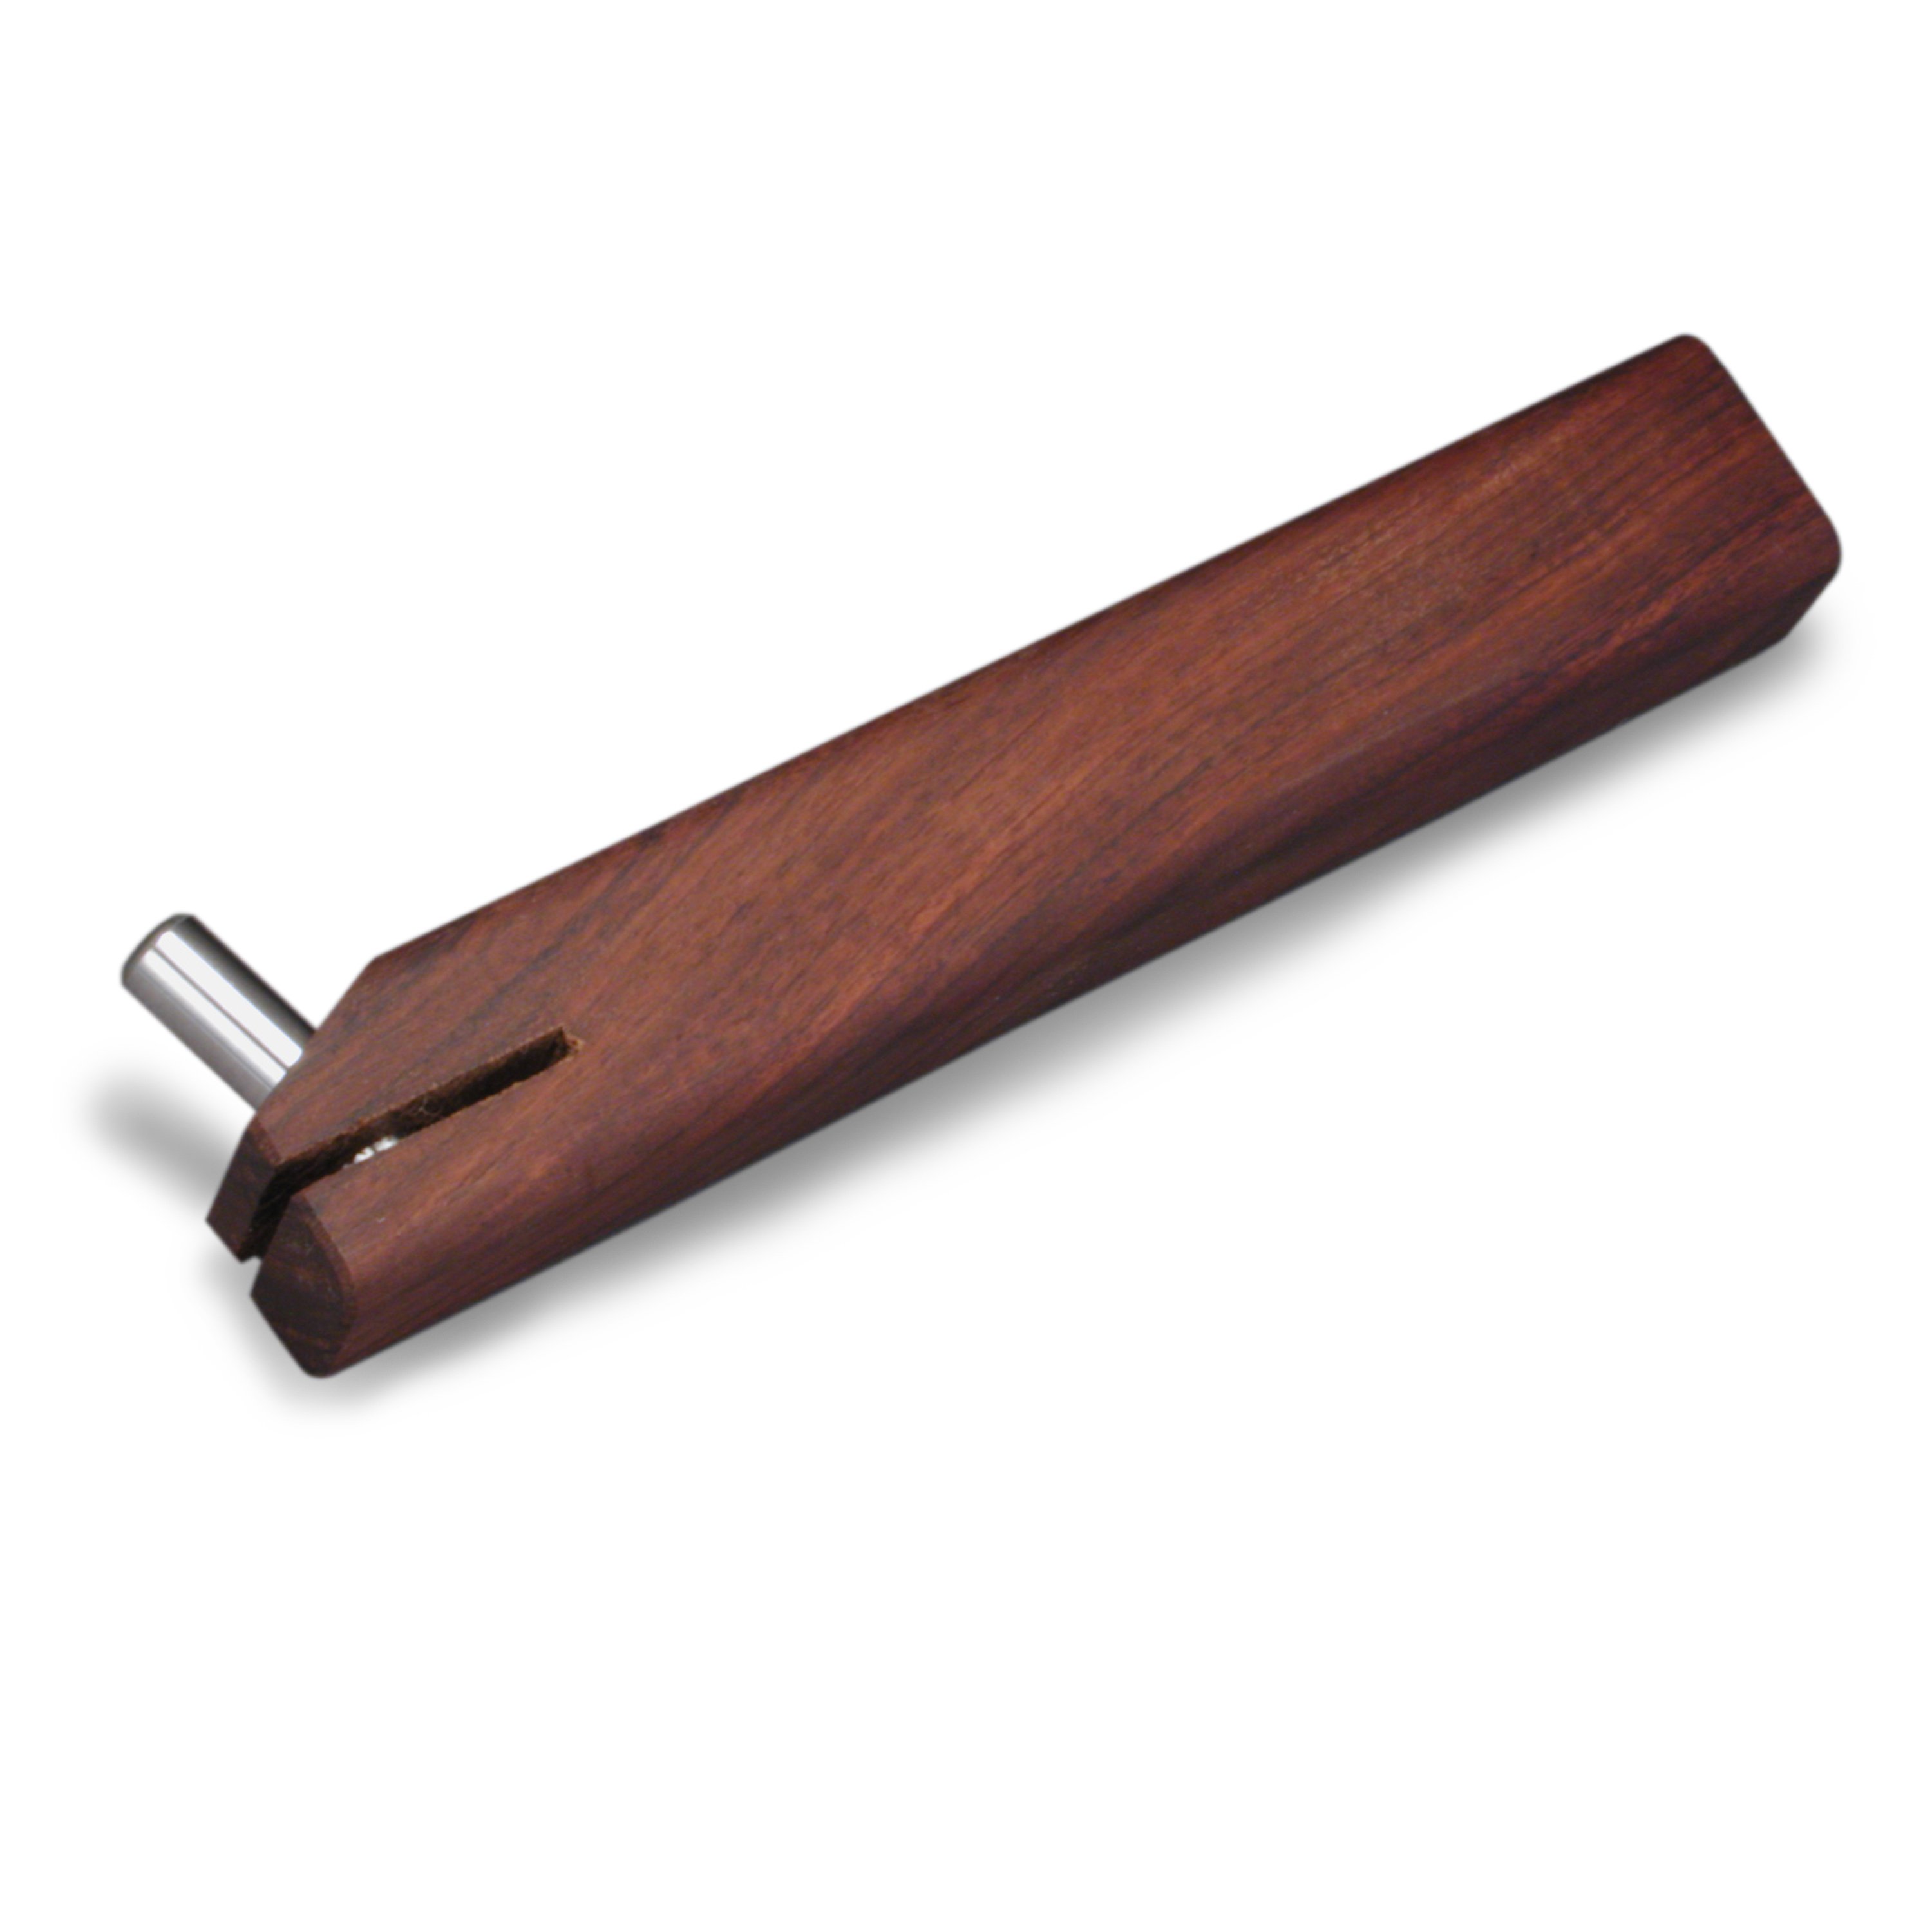
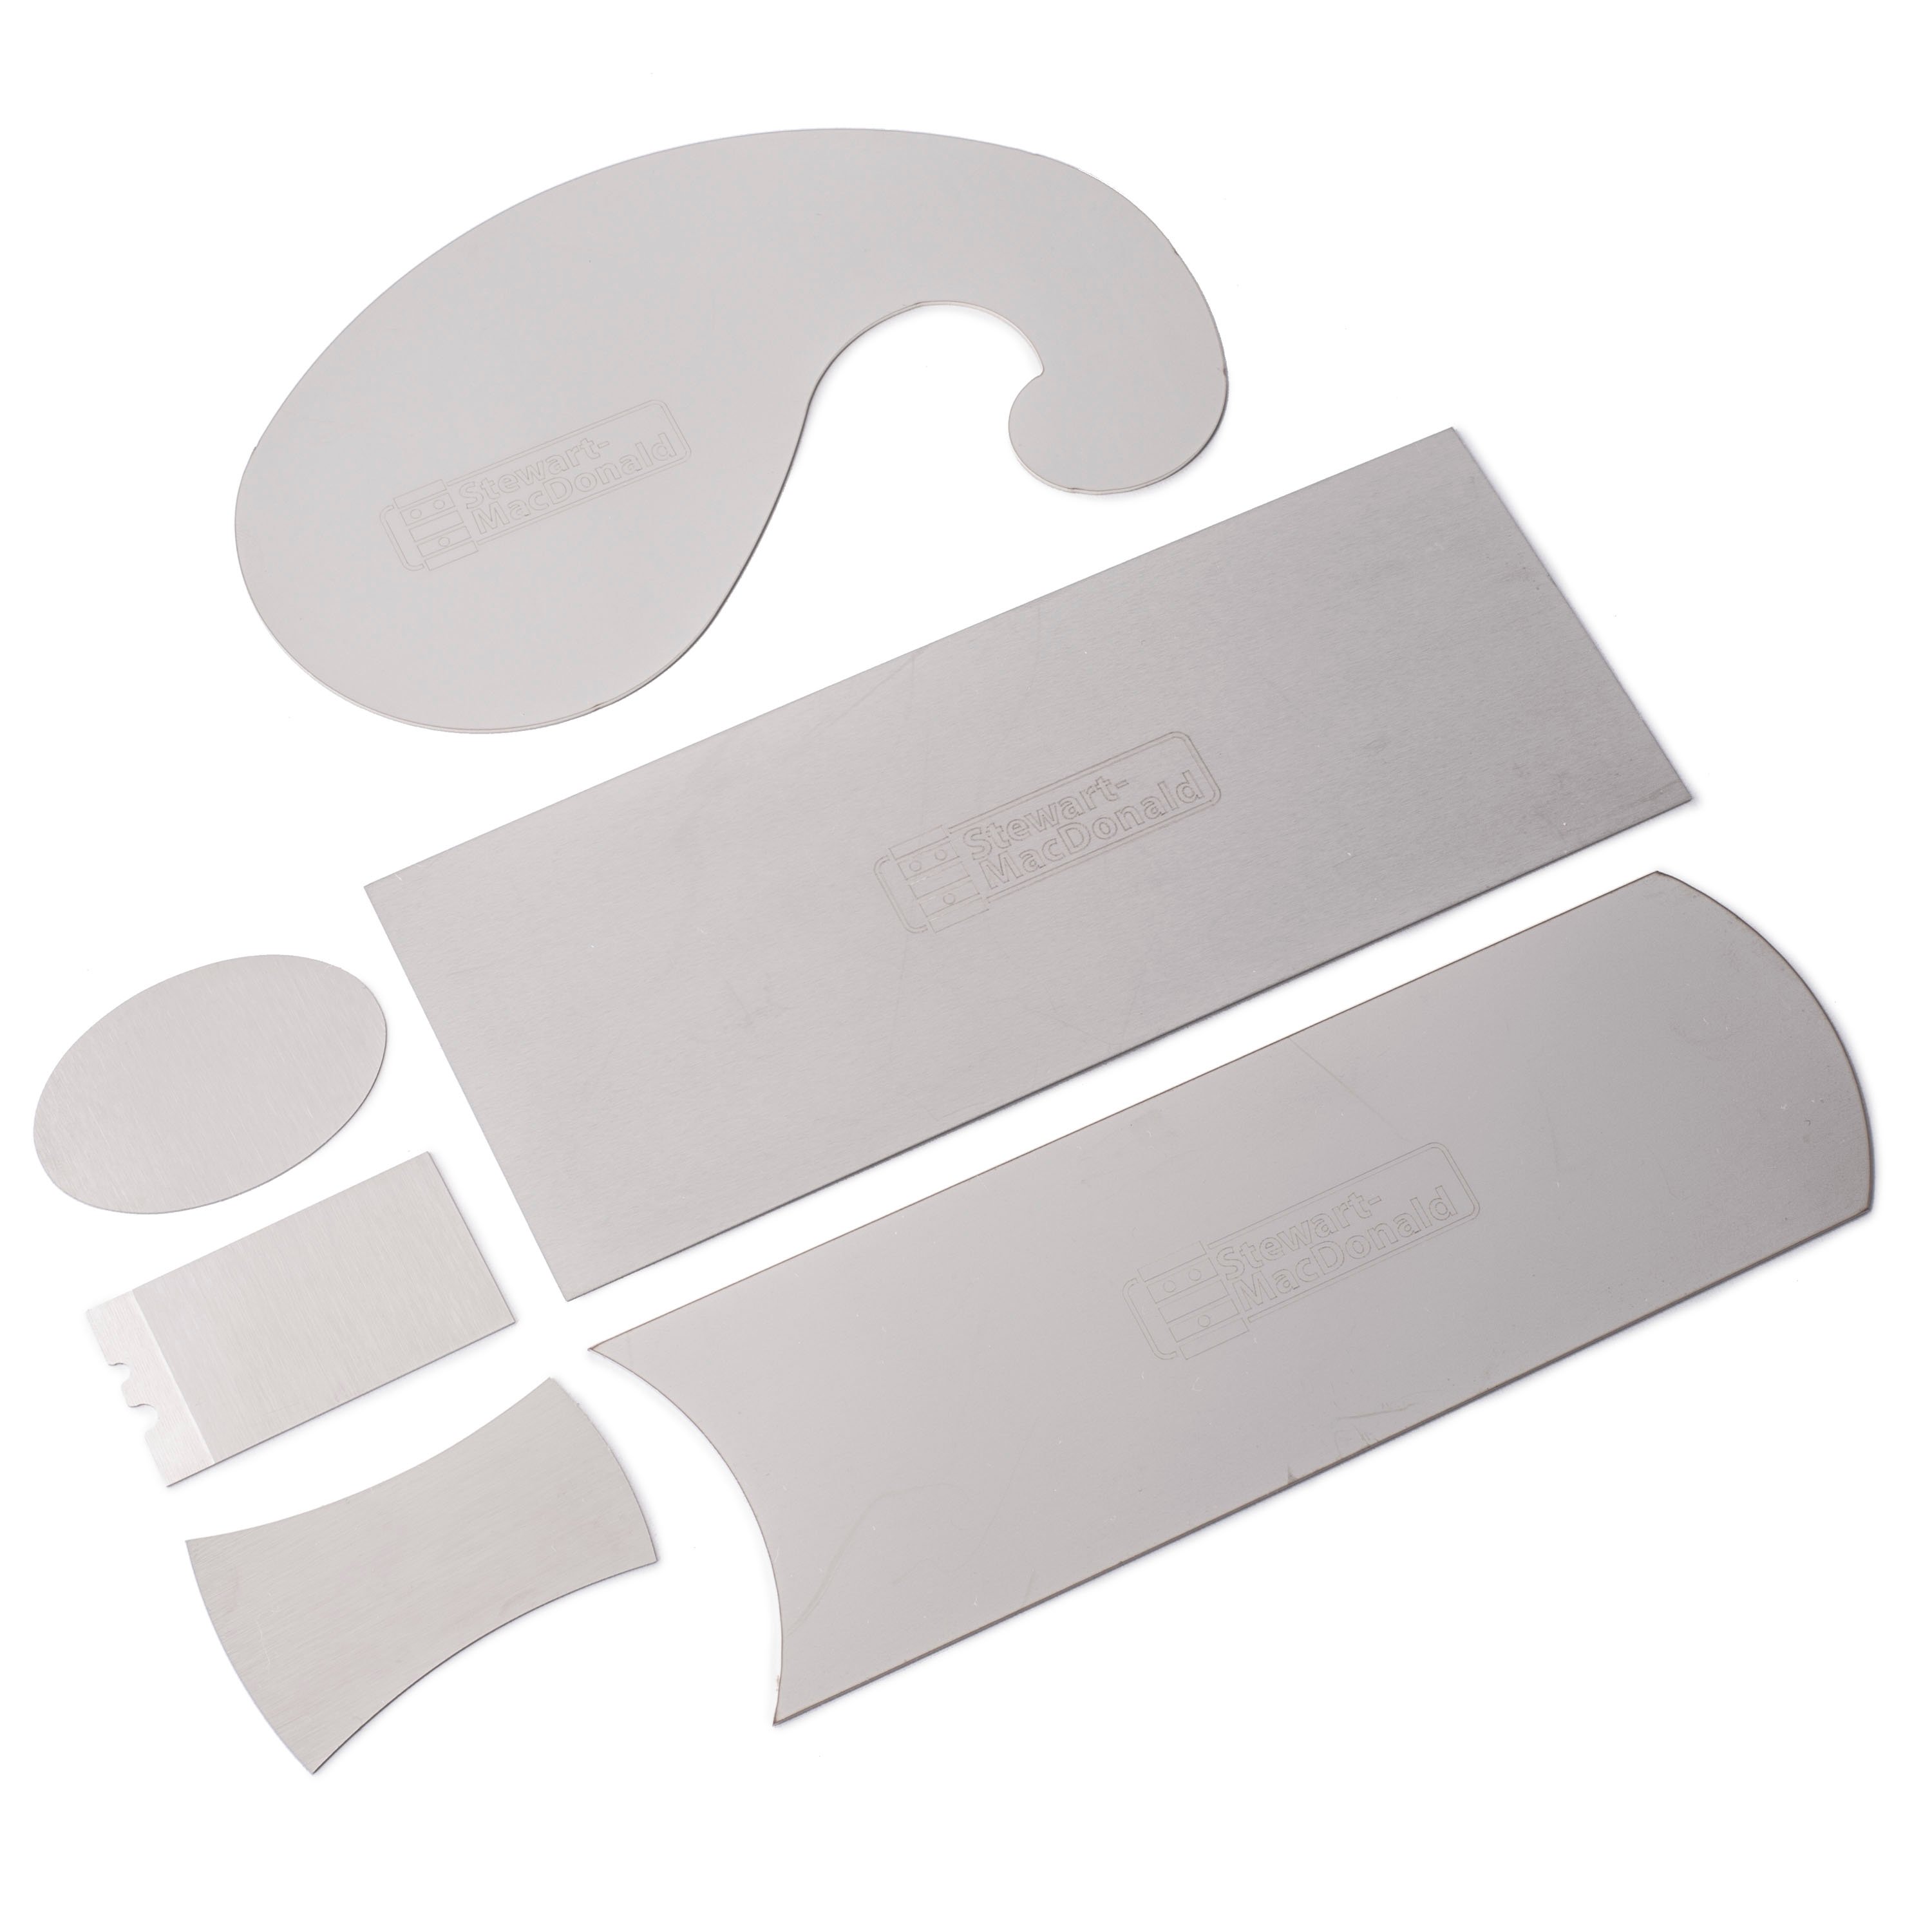
 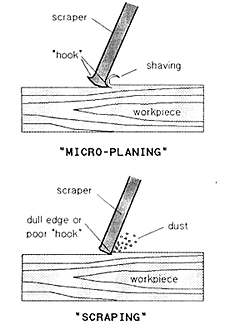 HOW DOES A SCRAPER WORK? HOW DOES A SCRAPER WORK?It's hard to think of a simpler yet more effective woodworking tool than the cabinet scraper – a flat, thin, post card-sized sheet of spring steel dragged by hand across a wood surface to leave a glass-smooth finish. Whether rectangular or shaped to conform to various contours, a properly sharpened scraper can tame the most contrary grains (even knots!) without tearing out. Applications range from crude to fine – everything from scraping glue out of tight corners to coaxing a high-gloss finish from lacquer or shellac. This remarkable ability comes from a microscopic, hook-shaped burr that is formed and polished by rubbing with a harder tool (i.e., burnishing) along the scraper edge. In fact, "scraper" is really a misnomer: "micro-plane" is more accurate because the burr on a properly sharpened scraper actually slices, lifts and curls a continuous shaving much like a plane but on a scale so small that tear-out is virtually eliminated. Whether a scraper micro-planes or merely scrapes depends primarily on the shape and quality of the burr (also known as a "hook"). Then it's a matter of pushing or pulling the scraper across the workpiece with just the right combination of angle of attack, pressure and speed. It does take some practice – "just right" is found mostly by feel. TIMBERLINE TOOL's SB-1 burnisher is designed to put micro-planing burrs quickly, easily and reliably on a wide variety of scraper sizes, shapes and thicknesses. Its burnishing pin is considerably harder (RC-62) than scraper steel. In the following process you'll discover how the SB-1 can turn a simple sheet of steel into a fine woodworking tool. |
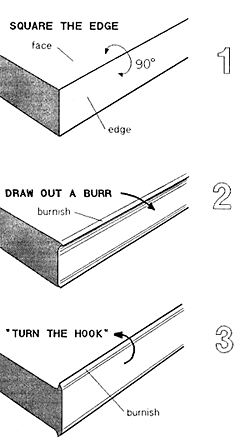 HOW TO SHARPEN A SCRAPER HOW TO SHARPEN A SCRAPER(60 seconds to "micro-planing") Just as really sharp knives, chisels and plane blades are finely honed and highly polished on both sides of their cutting edges, a really sharp scraper will have a mirror-finish burnished along both sides of a well-formed burr. The complete process generally takes three steps – 1. SQUARE THE EDGE (detailed instructions below) – The scraper edge is first jointed – squared off with a file – followed by honing both the edge and its adjoining face. 2. DRAW OUT A BURR (detailed instructions below) – The burnisher rubs a high polish along the face side of the scraper edge as it draws out a burr. This narrow band of burnished steel becomes the inner face of the hook after step 3. 3. "TURN THE HOOK" (detailed instructions below) – The outer edge is both polished and re-shaped by rolling back the drawn out burr with the burnisher. These last two steps – drawing out a burr and turning the hook – serve not only to polish both sides of the burr, but they also work-harden the tip of the hook slightly. The result is a sharp, hard (but somewhat brittle) cutting edge supported by tougher (less brittle) steel beneath much like a bi-metal chisel combines the best properties of two steels. Proper edge preparation is well worth the time. Plan to take it. You'll get a scraper that is sharper, longer lasting and easier to use. The simple guide block (shown at the end of these instructions) will help speed up the process. You'll also need an 8" or 10" single-cut mill, bastard file, and a fine, flat sharpening stone (and round slip-stones for curved scrapers). |
 1. SQUARING THE EDGE 1. SQUARING THE EDGEThis is the key to successful scraper sharpening. For only when the edge is truly square, finely honed and free of defects can the burnisher polish and shape the sharp, smooth, continuous burr necessary for micro-planing. The two steps involved – jointing and honing – are made considerably easier and faster with the shop-made guide block shown at the bottom of these instructions. CAUTION: A scraper that cuts wood will also cut flesh! Be especially careful in handling the scraper during all sharpening operations to prevent possible injury. Get a good grip on the scraper while jointing and honing – hold it firmly down on the bench when burnishing. Keep fingers out of the way in case something slips. JOINTING New scrapers may need a little more work initially at the jointing stage. They're usually punched or sheared from polished spring steel and are often left with burrs and/or rounded over edges which must be completely filed away. NOTE: When re-jointing scrapers, first draw cut the old burr according to step 2 (shown below). RECTANGULAR SCRAPERS – Hand-clamp an 8" or 10" single-cut mill file (bastard or fine) to the guide block as shown in figure 1a and draw the scraper flat along the block against the file teeth several times until the action is smooth and the edge is straight. File against the teeth only, easing up on the back stroke. Usually only the two longer edges of rectangular scrapers are used for scraping, but the shorter end edges can be used as well and are jointed in the same way. NOTE: New files may need to have burrs on the tang ground away to prevent marring scraper edges. CURVED SCRAPERS – Joint outside curves and shapes by rotating the scraper as it is drawn along the file. Joint inside curves with round or half-round files with the scraper clamped in soft-jawed vise. HONING Honing removes tiny serrations and burrs left from filing. A must for fine work, honing can be skipped for rough jobs like scraping glue. STRAIGHT EDGES – Hone the scraper edge on a fine sharpening stone until it is straight, smooth and defect free (1b). Slide the scraper and guide block together as a unit using the block to keep the scraper square to the stone. To prevent grooving the stone, which not only damages the stone but also dulls the scraper edge, hold the scraper and block unit askew to the line of travel, alternating the skew angle to either side every few strokes. An alternative technique especially useful for water stones is to use the narrow side of the stone, but there, too, the scraper must be held both perpendicular to the stone and askew to the line of travel. CURVED EDGES – Curved scrapers are more easily honed with the scraper clamped in a soft-jawed vise (1b). Hone outside curves with flat stones, inside curves with shaped, cylindrical stones. "Crab" the stones sideways as they work along the edge to prevent grooving. FACES – Using the guide block to apply pressure evenly along the scraper edge, slide the scraper and block together as a unit and lightly hone each working face (1c). Regardless of shape, keep the scraper flat and concentrate on the area near the working edge. IMPORTANT – Wipe the scraper (and block) clean! Any oil or water honing lubricant left on the scraper will contain grit which can damage scraper edges during burnishing. |
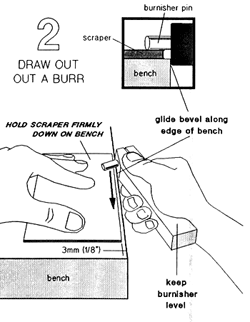 2. DRAWING OUT A BURR 2. DRAWING OUT A BURRFIRST, OIL THE BURNISHER PIN – To reduce the inevitable wear that happens when steel meets steel, put a drop of machine oil on the pin in the alignment slot and another on the exposed pin. Repeat often especially at the first sign of jerky or gritty burnishing action. If it persists, see part 4 – "If the going gets rough" Hold the scraper firmly down on a sturdy bench or table with the scraper edge parallel to the bench edge and back about 3mm (1/8"). Grip the burnisher as shown and, starting at the far corner, bear down with a few pounds pressure and draw out a burr along the edge of the scraper, letting the pin "click" off the near corner in about the time it takes to say "thousand." Keep the burnisher level (parallel to the scraper face) and glide the bevel along the edge of the bench – this positions the pin at just the right angle to draw out a burr smoothly and give it a mirror finish. Usually one solid, steady stroke is enough. Too many strokes may embrittle the edge causing it to crack when the hook is turned. Curved or specially shaped scraper edges are drawn out in a similar way, shifting the scraper as required for solid support near the edge of the bench. |
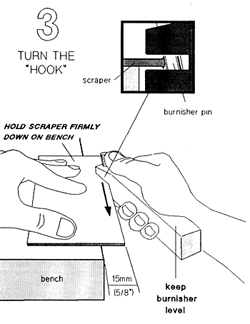 3. "TURNING THE HOOK" 3. "TURNING THE HOOK"Once a burr is drawn out, extend the scraper beyond the bench about 15mm (5/8") and hold it firmly down on the bench. Capture the scraper edge in the burnisher's alignment slot and starting at the far corner, press the pin against the scraper edge and draw the burnisher along the edge in one steady, continuous stroke, letting it click off the near corner in about the time it takes to say "thousand." Use side pressure only. IMPORTANT: Note how the burnisher is held. It's level (parallel to the scraper face) with the back of the alignment slot just touching the edge of the scraper – this positions the pin to roll back and polish a proper burr. The thumb is pressed against the pin form better control and to be out of the way in case something slips. Fingers should be back of the alignment slot. It's hard to say just how much pressure in needed for a good hook – less than you might think. Start with a moderate burnishing stroke, and test the scraper on piece of hardwood. Repeat the process, gradually increasing burnishing pressure until the burr micro-planes easily at ten to thirty degrees off vertical. When you've gotten "calibrated," try to turn the hook in one firm, smooth burnishing stroke. Too many strokes or too much pressure puts too much hook on the burr resulting in steep scraping angles which require greater scraping pressure, excessive heat build-up, brittle edges and premature wear. Practice and individual preference determine what works best. Burnish curved edges a section at a time by shifting the scraper as required to new positions along the bench edge. Try to blend sections together. Roll hooks on tight inside curves or special shapes with the extended portion of the pin held at the same angle as for edges captured in the alignment slot. Finally, wipe off any residual oil, and the scraper is ready. RE-BURNISHING Wear will eventually take its toll and you'll need to rework the edge. How soon is difficult to predict, but usually the hook can be restored up to four or five times without jointing or honing by simply redoing steps 2 and 3 – DRAW OUT THE BURR and TURN THE HOOK. When this no longer gives a satisfactory edge, start over at step 1 – SQUARE THE EDGE. |
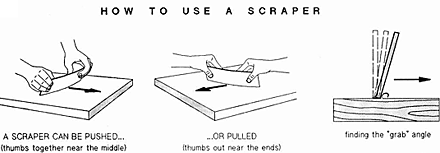 Rectangular scrapers are usually worked with both hands either by pushing (thumbs together near the center) or by or by pulling (thumbs out near the ends) the scraper along the workpiece. Here's how to start. Hold the scraper upright and slightly bowed, and gently push it across the workpiece gradually increasing the angle of attack until the burr starts to "grab." Maintain the grab angle while increasing scraping pressure until a continuous shaving starts to roll off the burr. Once you get the feel of the "just right" angle and pressure, speed up the strokes and there you have it – MICRO-PLANING! Curved or shaped scrapers are usually pulled with one hand, but the principal is the same. Work the scraper shape along the corresponding workpiece shape, upright at first, increasing the angle of attack until you find a "grab" angle that will micro-plane all across the shape. Keep the grab angle at a minimum – just enough to make continuous shaving. Avoid the natural tendency to press too hard at too sharp an angle of attack. Either causes excessive heat which breaks down the burr and may ever burn thumbs and fingers. Besides, it's too much work. To prevent "washboarding" the workpiece surface, work the scraper askew to the line of travel alternating the skew angle to either side every other stroke or two. Don't be discouraged if at first you do more scraping than micro-planing. It's largely a matter of feel that only practice can teach. But, once learned it's a skill you'll have forever. "If the going gets rough..." Though rare, it is possible that the hardened burnisher pin may become galled. Excessive heat causes it – burnishing a burr too quickly, perhaps a dry pin. Tiny deposits of the softer scraper steel tend to pile up on the pin. The symptom is rough or gritty burnishing. If this should occur, try the following. First, twist the pin to a new, "fresh" spot – clamp the exposed portion of the pin in a vise or drill chuck, and gently twist the burnisher handle one-eighth turn either direction. Repeat as necessary, twisting the handle in the same direction each time. When no more smooth spots can be found, chuck the exposed pin in a drill press, and gently twist the handle free of the pin. Run the drill press at a moderate speed (700-1000 rpm) and press 600 grit wet/dry carborundum paper against the spinning pin, working it up and down the pin until the pin shines like new. If necessary, turn the pin over in the chuck and polish its other half. Then, carefully reinsert the pin (tapered end first) into the handle. 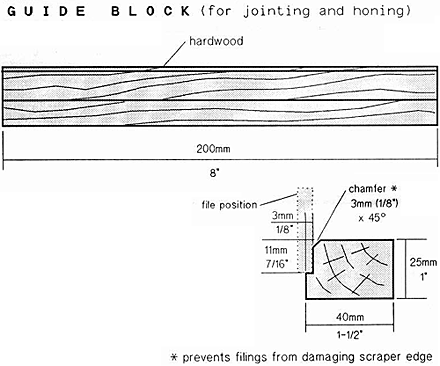
|
