Mounting Instructions for Mandolin Pickguard
How to mount a mandolin pickguard.
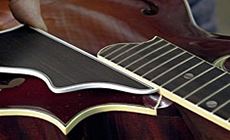
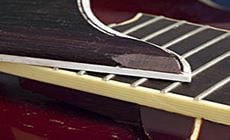
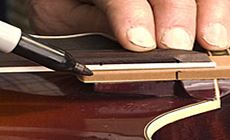
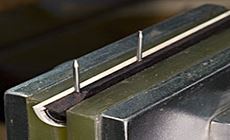
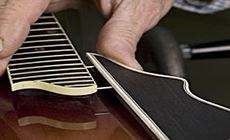
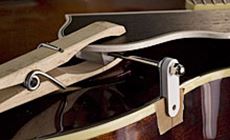
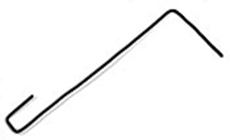
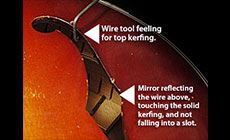
Make sure that the pickguard does not overhang the body when viewed from above. Mark that location. Then decide how high you would like it to be mounted. It could be flush with the fretboard surface or below. On the underside of the pickguard there is a layer of material used to stiffen the pickguard that might get in the way. You may need to file some of it away (pictured) to keep it from holding the pickguard off from the board. There are already holes in the pickguard for the mounting pins. Put some tape on the edge of the fretboard and mark where the guard holes are. Avoid placing the holes exactly aligned with fret slots. Make sure to keep the distance between pins accurately marked out. With a pipette or toothpick, put some super glue in the holes in the pickguard. Tap the pins in with a small hammer. Have the points up and hold the pickguard in a vise (pictured) to avoid cracking the glue joint between the pickguard and the stiffener. Gluing the pins will assure that they remain in the pickguard if it is later removed from the instrument. Drill the holes you just marked in the mandolin. To clear the body with the drill chuck you will need to use an extended length drill bit. The pins and holes are 1/16" diameter. Mount the pickguard by pressing the pins in the guard into the holes in the side of the fingerboard. Position it in the best spot and put a piece of tape on the side of the mandolin under the clip to mark where the hole will be (pictured). This mark needs to line up with the solid wood of the kerfing, so you don't put the mounting screw in the empty space of the saw cut. A specially modified clothespin will give you a longer reach to clamp well. This carved clothespin is slim and will get under the small space between the clip block and the mandolin top. Put a small mirror inside the mandolin and use a special alignment tool you can make out of wire to confirm that your mark is OK, or shift that mark to avoid a kerf slot. You want the wire hitting the kerfing between saw cuts (pictured). When held vertically, the wire outside will line up with the wire inside and this simple tool is used to see if the first mark is OK or if it will need to be shifted. Drill the hole and install the mounting screw. Mix one drop of Vintage Amber ColorTone Stain in some alcohol/acetone solvent. Make sure it is very weak so you will not overdo it. Staining twice is better than overdoing it the first time. When dry, replace the clip. A really good glue for this is "Goop" from Eclectic Products (available in many hardware stores and home centers). Goop stands up to the flexing and pressure the pickguard will go through over time. Remove the pickguard to glue the clip block. Spread a liberal amount of Goop on the block. Protect the mandolin's finish from glue drips by placing paper under the freshly glued block. Put the pickguard back in place and clamp with the modified clothespin. Let this dry for 12 hours before removing the clamp.Position the pickguard on your mandolin for the best look and fit.
Install the provided pins in the pickguard.
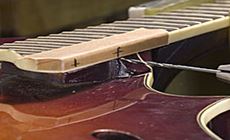
Lay out the location of the pickguard side clip.
Test your mounting screw alignment.
Optional: stain the white clip to match the color of your aged binding.
Glue the pickguard clip block to the underside of the pickguard.