Making new tuners look vintage
How to add 50 years in 30 minutes
This ’57 Les Paul Jr. needed new tuners, but I didn't want to take away from the guitar’s vintage looks. Here’s how I made that new hardware look old, fast.
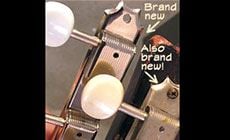
Plan A was new knobs. This is Plan B: new tuners.
This guitar’s tuner knobs were rotting right off the posts. Dan Erlewine and I looked it over, and saw two options: replace the plastic tuner knobs, or install a new set of tuners. The knobs-only approach is the truest to vintage, but such old tuners often aren’t working well anyway. That’s when a new set is needed.
We decided to do both options to show Trade Secrets readers.
Dan’s knob replacement story ran a few weeks ago. Here’s Plan B: installing a new set without losing the vintage looks.
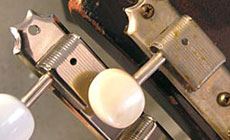
I started with a set of vintage-style tuners with the same shape and embossing as the originals.
They’d fit right in on a cleaner guitar, but I wanted these to look old and nasty! The trick is something I saw online recently at the Les Paul Forum, and it’s available at Radio Shack: etchant solution for printed circuit boards. This fluid contains ferric chloride, which eats into metal surfaces.
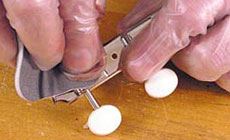
Scuff-sanding
Before using the etchant, I scuff-sanded the tuners with an 1800-grit Micro Mesh finishing pad to distress the plating a bit. I didn't go crazy with it, just enough to knock off a little shine and give the solution something to bite into. Then I was ready for the etchant.
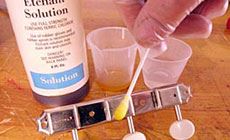
Etching
The etchant is corrosive, so don’t mess around: wear gloves and eye protection, and work in a well-ventilated place. It also works fast, so it’s a good idea to test this on some scrap hardware first. You can control its working time by diluting it with water. I used 3 parts etchant to 1 part water. This did a nice job of dulling the tuner plating. A stronger mix will give a stronger effect. I gave it a light touch — I wanted it to look like something from the 1950s, not from the Lord of the Rings.
I applied the etchant with a Q-tip, and the process happened quickly — be ready to move fast. Once you get the look you want, give the tuners a good rinsing in water to stop the etching. Most modern vintage-style tuners are packed with lubrication which will protect the gears. I simply dried these with a paper towel, then used a can of compressed air to blow out any water.
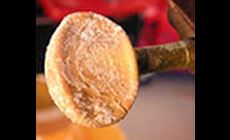
Staining
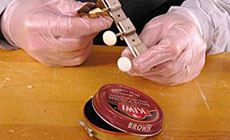
The knobs still needed to be aged. I tried stains, tea, and coffee to yellow them, but wasn’t happy with the results until I tried good ol’ brown Kiwi shoe polish. I rubbed it into the knobs with a soft cloth, and let dry for 20 minutes. Then I took off the excess polish with a clean paper towel, and they looked great!
The final touch: age spots!
Dan came up with a great suggestion for adding some more age: taping off the tuner knobs and spatter-painting the exposed metal with shellac mixed with a little ColorTone vintage amber stain.
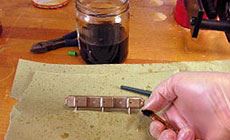
This shellac-speckling was the icing on the cake; it gives ’em the genuine honkytonk look, don’t you think?
To thoroughly clean up this vintage Junior, we removed all the hardware, even the grommets around the tuners. (Be careful if you try that — it’s really easy to chip the finish!) With Q-tips and elbow grease, all the dirt came off, and we used no-silicone polish to get it looking like 1957 again!
Fast! Shipping
Orders received by 4pm EST (M-F) ship the same day.
In by 4, out by 5
Thanks to the best warehouse team in the industry!


