Guitar Screw Rescue Kit Instructions
How to use the Guitar Screw Rescue Kit to remove small damaged screws.
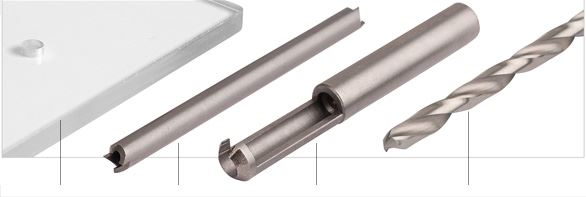
Alignment guide
Keeps the extractor or drill bit centered.
Screw extractor
Bores around broken screws to remove them.
Plug cutter
Cuts 3/16" plugs to fill the holes created by the extractor or drill bit.
3/16" Drill bit
For holes that match the plugs created by the cutter.
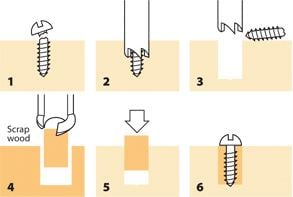
The easy way to replace small broken screws
The small screws used on guitars are easily broken, leaving a screw shank embedded in the wood. The Guitar Screw Rescue Kit solves the problem of removing the broken screw without gouging the surrounding area.
The extractor bores around the screw to capture and remove it, leaving a clean 3/16" hole. This hole is neatly filled by a scrap wood plug created with the plug cutter. With the plug glued in place, you're ready to install a new screw.
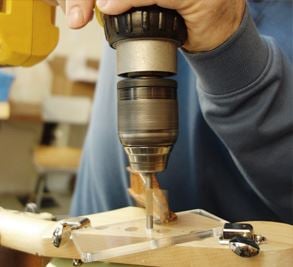
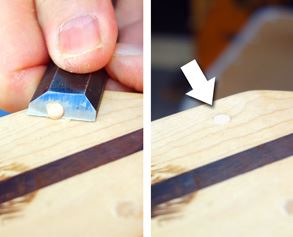
Using the clear guide to keep the extractor centered over the screw.
Using the screw extractor
Remove the surrounding hardware and clamp the alignment guide over the broken screw to keep the extractor centered and square to the surface.
Wrap a piece of tape around the screw extractor to mark the depth of your cut, so you don't accidentally cut too deep.
Insert the extractor in the clear guide and run the drill in reverse (the extractor has reverse-cut teeth). Drill to the desired depth, then continue running the drill as you remove it from the hole. The captured wood with screw will break off inside the screw extractor. The captured screw can be pushed out of the extractor with a piece of wire coat hanger or a 3/32" drill bit. The resulting hole has diameter of 3/16", sized to match the plug cutter.
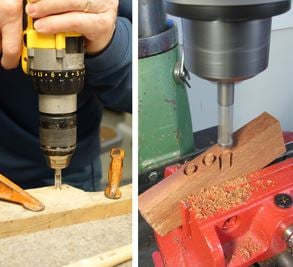
Cutting plugs with a hand drill (left) and with a drill press and vise (right). In the drill press photo, the scrap wood is clamped at an angle. This creates a plug with grain direction that exactly matches a mahogany peghead.
Using the plug cutter
Plugs can be cut using a drill press or a hand-held electric drill. A drill press is the most controllable way to go, resulting in clean, straight plugs. But a hand-held drill also produces good plugs: keep a steady hand, blow the chips out of the way often and don't try to cut too deep.
For nearly-invisible repairs, cut your plugs from scrap wood that matches the piece being repaired. Look for grain that is similar to the repaired area. (If the plug will be hidden by hardware or painted over, grain matching isn't needed.)
Using a sharp chisel to cut the installed plug flush to the surface.
Gluing plugs
Waterbased glues like Titebond or hide glue work best. The moisture in these glues swells both the plug and the hole for a good fit. Super glue can also be used, but may leave a witness line.
After gluing the plug, use a sharp chisel to level it with the surrounding surface. If you level the plug while it's still damp with glue, it will shrink slightly below the surface when it dries. This slight recess is useful when you want to cover the plug with a finish touch-up. A drop of finish will fill the recess, bringing it level.
Repairing stripped screw holes The 3/16" drill bit included in the kit matches the size of the plugs, making a clean, convenient way to fill stripped or loose screw holes. Drill out the worn hole with the 3/16" bit, glue in a matching plug, and you're ready to install a replacement screw.