Mandolin Tuner Drill Jig Instructions
Tuner installation instructions using the Mandolin Tuner Drill Jig.
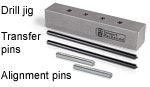
I-5008
 |
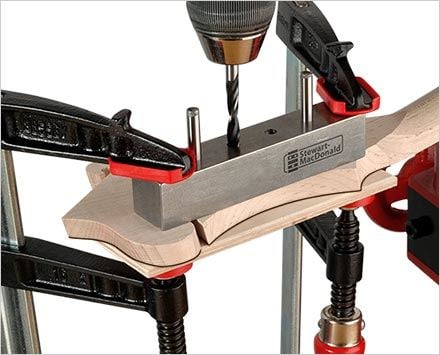
The Mandolin Tuner Drill Jig is designed for drilling accurately spaced 1/4"-diameter pegholes for installing modern mandolin tuning machines. This drill jig can also be used to retrofit modern tuners onto older mandolins. |
|
|

|
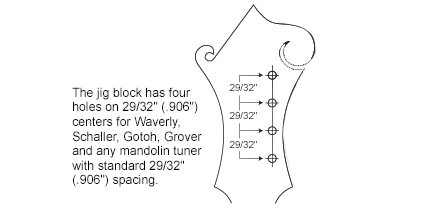
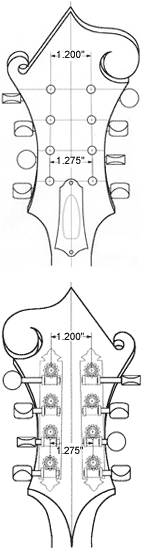
Installing new tuners 1. Lay out the location of the string posts on the front face of the peghead. The tuner baseplates are usually not located parallel to each other, but are slightly closer together toward the peghead tip. The illustrations are suggested peghole locations. You should double-check these, since several sizes and variations of this peghead exist. 2. To transfer the hole locations to the back of the peghead, draw four lines, each connecting the centers of the holes directly across the peghead from each other. 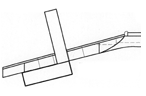 Square up from the back to meet the four cross lines on each side, and connect those lines to make four lines across the back of the peghead. Square up from the back to meet the four cross lines on each side, and connect those lines to make four lines across the back of the peghead.
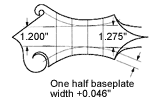 3. Draw an arc, parallel to the edge of the peghead, which is one-half the width of the baseplate, plus .046" (3/64"). This will keep the baseplates from hanging over the edge of the peghead. Draw a pair of straight lines, tangent to the arcs, that taper slightly toward the tip of the peghead and give the tuners a pleasing "look" and functional location. 3. Draw an arc, parallel to the edge of the peghead, which is one-half the width of the baseplate, plus .046" (3/64"). This will keep the baseplates from hanging over the edge of the peghead. Draw a pair of straight lines, tangent to the arcs, that taper slightly toward the tip of the peghead and give the tuners a pleasing "look" and functional location.
4. Place the sharp pointed transfer pins through the outer holes of the jig, and position the points on the peghead where the corresponding peg hole centers are marked. With the tip of the pins pressed into the wood, slide the jig down the pins to contact the peghead. The pins should hold the jig positioned while you clamp it to the back of the peghead. 5. We recommend clamping the jig to the back of the peghead, and drilling the holes from the back. Since the F-style peghead commonly has a tapered thickness, this method keeps the holes square to the back of the peghead where the plate will sit flat. This enables the tuners to fit properly (the sketches illustrate what happens when the holes are not square to the back of the peghead). 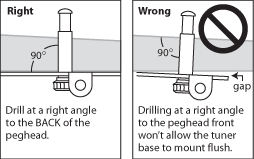
6. The drill press table will require blocks or shims to level a tapered peghead. When using a hand drill, hold the drill loosely and let the jig guide the bit for squareness. If possible, always start each hole by turning the drill bit in reverse, then go forward to drill the hole. This helps prevent chip-out of the wood or the peghead finish. 7. The steel alignment pins should be used when drilling holes in a new mandolin. With the jig clamped onto the peghead, drill one of the outside holes. Place one of the steel pins in that hole and drill the other outside hole. Place the second alignment pin in that hole so that the two outside holes are pinned, then drill the remaining two holes. This technique will really make a difference in the accuracy of your holes, and in the way the tuners will work. 8. Test-fit the tuners. If the drilling is done properly, the tuners will have a close fit. Force should not be needed to seat the tuners completely into the peghead. 9. The string post holes can now be drilled and reamed for the peghead bushings. Ream a few holes in scrap wood to verify the proper depth and diameter, and mark the reamer accordingly. Each bushing should press in, with only a moderate amount of pressure needed to seat it completely. 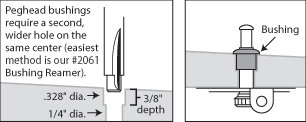
10. Once the tuner and bushing holes are made properly, and the tuners fit nicely into the peghead, turn your attention to drilling the mounting screw holes. These holes must be drilled concentric to the holes in the baseplates; otherwise they can put stress on the gear mechanism, and cause the tuners to perform below their potential. First use a drill bit that is the same size as the five mounting holes in the baseplate (7/64") to make starter holes for the final size drill. Hold the tuner baseplates in place on the peghead, and use their holes to locate and drill starter holes 1/32" deep. Follow this with a 5/64" drill bit for the second drilling for the mounting screw threads. A piece of tape wrapped around the bit will function as a stop to prevent inadvertently going through the front side of the peghead. The smaller bit will stay centered on the pilot hole, to keep the mounting screws concentric to the baseplate holes. The last step is to mount the tuning machines to the peghead with the screws provided with the tuners. Redrilling or replacing tuners If redrilling is needed, it's best to plug the old holes first — trying to redrill an existing hole usually won't work. If you are replacing non-reverse gear tuners with reverse-gear tuners, you will have to plug all of the holes and lay out the new holes as described above for a new installation. If you are replacing tuners of similar orientation, i.e. reverse-gear with reverse-gear, and you want to renew old worn holes or correct inaccurate hole spacing, the technique is to plug all but one of the holes on each side. Usually you should leave one of the middle two holes. This will help in the layout and location of the holes and keep any evidence of redrilling to a minimum. Place one of the alignment pins in the unplugged hole to locate the drill jig. If the hole in the peghead is too large for the pin, a few of wraps of masking tape around that end of the pin will snug the pin into the hole. Align and clamp the jig onto the back of the peghead, using the same alignment techniques discussed earlier, and drill the three plugged holes. Drill the hole farthest from the pinned hole first. Place the other pin in this hole to additionally keep the drill jig in solid alignment while drilling the remaining two holes. Repeat this on the other side (treble or bass). Now plug the two remaining holes, one on each side. Once plugged, insert the pins with the drill jig into the two outside holes to align the jig, and drill the last hole on each side. |