How to install a bolt-on neck
Issue 245 June 18, 2015
When a local music venue burned down, this Strat was in the blaze. The neck burned like a candle, but Erick Coleman has salvaged the body. This is a good opportunity to show how to install a Fender style neck.
About the guitar in this video: this Strat was in a gig bag near the stage of The Union in Athens, Ohio when a neighboring business caught fire and destroyed the building. This guitar will keep its charred body and rock again with a new replacement neck.
- Fire-damaged Strat plays again
- Aligning/clamping the neck
- How to mark the location of mounting bolt holes
- Using a radius sanding beam as a cradle in the drill press
Video Transcription
[on-screen text reads: Stewart-MacDonald Trade Secrets!]
Erick Coleman: Late last year, our town lost a favorite music venue, The Union, when a fire broke out in an adjoining business and took most of the block with it. Fortunately, nobody was injured, but a lot of musicians lost gear in the blaze. This Strat was leaning against the wall in a gig bag and it burned from the neck down to about the 14th fret area here. While the torn is pretty charred and the guts were trashed from water damage, the guitar's overall intact.
I touched up the finish as much as I could with super glue [on-screen text reads: The owner wants to keep the burnt look], cleaned up all the screws and hardware, and now I'm going to put a new neck on it. I'm going to show you how to do it.
Installing a bolt-on neck
Neck pockets can vary a little bit so that's something to take into consideration when choosing your replacement [on-screen text reads: Replacement Neck for Strat]. Since this is a fender body, I'm going to go ahead and use a licensed neck to ensure a proper fit.
They don't come with neck mounting holes drilled, so I'm going to have to make those match the holes that are already in the body. I'm using a Cam Clamp and a soft wooden call to temporarily hold the neck on. I've strung it up with low and high E-strings so I can check the alignment. What I'm looking for is even distance between the edge of the fret board and the low E and the edge of the fret board and the high E. You want those to be equal for proper alignment.
Drilling out the neck holes
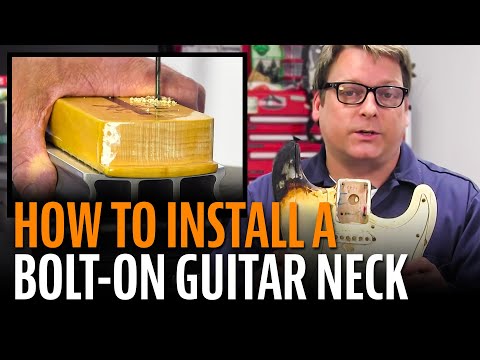
Now it's time to knock out the neck holes. There's a lot of different ways to do this, but a real simple way is to find a drill bit that fits the hole in the body perfectly [on-screen text reads: Brad Point Drill Bit] and just give it a little turn and what that does is it scores the finish, kind of leaves a little dimple that you can use as a reference point when you go to drill the holes.
I used a one eighth drill bit to drill the holes in the heel [on-screen text reads: Tip - A radius sanding beam cradles the neck while drilling]. Now this neck is ready to mount.
Installing the neck
Before installing the neck, I'm going to drag the screws across Tap-Ease Lubricant just a little bit. What this is a thread lubricant that'll help drive the screws into the hard maple a little easier without any trouble.
This thing's ready for strings and after a good setup, it'll be ready to rock.


