Grain runout made this guitar bridge pop off!
Issue 252 November 05, 2015
BANG! While this guitar was being played, the bridge popped off with a sound like a gunshot. Before Dan Erlewine glues it back on, he explains the likely cause of this trouble: grain runout in the guitar’s cedar top.
About the guitar in this video: this Alvarez classical has seen a lot of arpeggios. It’s a nice guitar built of solid woods—no plywood. The grain runout problem is not uncommon, even in quite expensive guitars.
- What is grain runout?
- Dan gives a great little demonstration, with visual aids
- Scoring and removing finish for better bridge gluing
- Using the Saddlematic to correctly position the new bridge
Video Transcription
[on-screen text reads: Stewart-MacDonald - Trade Secrets!]
Grain runout = bridge trouble
Dan Erlewine: The bridge popped off this guitar right while the fellow was playing it. And I bet it scared the heck out of him, because it happened to me back at Herb Davis in Ann Arbor in the sixties. We were standing in the store and the bridge flew off a D-35 Martin that was strung at pitch, brand-new guitar and it sounded like a gun. Oh, man. We were freaked out.
From the looks of it, a couple of things caused this bridge to pop off. For one thing, they didn't strip the finish all the way to the back edge of the bridge. There was almost three-sixteenths of an inch of no glue there. When they sprayed this with a thin polyester, they taped this off with tape, I would guess. Then after they buffed it, they come in and cut with a knife through that finish around the tape pretty quickly and cut right through the thin finish into the wood. So this is cut there and it's been cut back here. That means when the bridge wants to pull up, it peels the wood right off with it. Also, that's because this has runout, and runout happens when you saw through a board at an angle and it doesn't have any strength that way and it's easy to flake off.
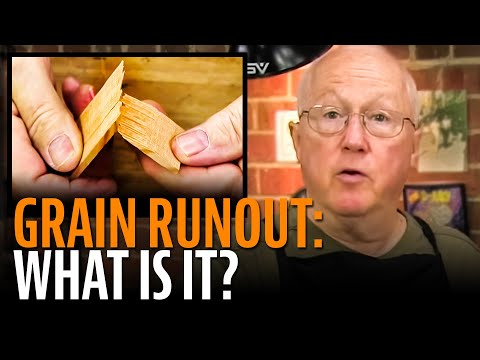
What is runout?
I can explain runout with this little block of Douglas fir. Imagine this is the tree, standing tall. These are the annular rings, so it was a very large tree. If you cut this piece of wood, you can see how straight the grain is on each end. If you cut it like this, which I did with a knife, it's split right along the grain and that's a very strong piece of quarter sawn Douglas fir. Strong this way. However, if you cut it on an angle through the tree like that, which is often done, you get runout. It looks as good as this piece. From each end, look, you think, "Boy, that's a nice piece of quarter sawn." But when you go to break it, it breaks like this and that's what that bridge is tearing off. It's ripping up fibers.
Fixing the bridge
I pinched the old bridge together where it was broken and put it on the top and found its footprint. The fibers are locked in together. And then to know where the location of the saddle was, I used the Saddlematic tool, those two pins right against the saddle in the locating block tightened at the 12th fret. Then I brought in my new bridge, the StewMac Classical Guitar Bridge and I know where to locate that. It'll play in tune just like the other one.
[Dan clamps the bridge down using StewMac Soundhole Clamps]
I've got the bridge lined up this way and this way thanks to the Saddlematic and now I'm going to scribe around it [on-screen text reads: StewMac Inlay Tracing Scribe], not cut through the wood, but just make a mark that I can strip this finish to. I think this is where they made a mistake earlier. I'll get a nice footprint to glue to.
This is the Two Cherries Guitar Brace Chisel that sits flat on the top with that scoop in the blade and lets me slide right along this straight edge and remove the lacquer up to the scribe line.
Clean-up
Once I'm down to the clean wood, it's pretty clean. I'm just using a little hot water damped to see if I pick up any gluey residue. And I'm looking at places where the run out is kind of flaky like under that piece. I'll be sure to squeeze a little glue under those flakes if I can get them to lift up. I think my new glue joint on the outside though is going to give a really good grip.
[Dan applies Titebond Wood Glue to the bridge area he just cleaned and installs the new bridge. He has applied Protective Tape to the entire area surrounding the bridge]
One nice thing about this polyester finish is that it's impervious to most anything, including water, so clean-ups real easy. You can let Titebond dry for a few hours, but I'm going to let this dry for two days. There's a lot of glue in there. It's penetrated that wood and I really want it dry because I don't want the bridge to come off again and I don't think it will.


