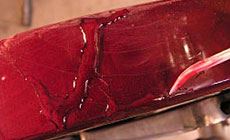
Mixing red epoxy for cherry-finish repairs
To correct a bad repair on these nasty cracks, I mixed up some red-tinted epoxy

Boy, this 1960 Les Paul looked like trouble when it came in the door: deep cracks through the body that somebody had already tried and failed to fix. It took two glues to set things right...
Fixing somebody else’s fix:
What went wrong before?
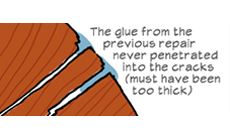
The previous repair was done with superglue, which would have worked if it had really gotten down into the cracks. Fresh water-thin superglue will wick its way into a glue joint, but this glue had been too thick (maybe too old): it just sat on the surface and left the deep cracks untouched.
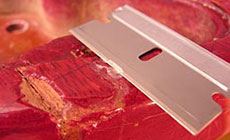
I had to chip away a lot of dried superglue before I could start the repair. A fresh single-edged razor blade, held almost flat, slid under the edge of the glue — lifting it from the bare wood and finish beneath it. Superglue removes easily from dirty or oily surfaces, which this guitar had plenty of.
Two glues: One down deep, one to match the cherry red
For gluing the deep splits through the mahogany body, I used hot hide glue. For repairing the finish, I tried something new: slow-setting epoxy tinted with ColorTone stain.
Hot hide glue into the cracks
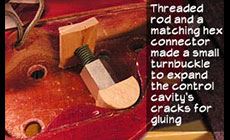
To push open the cracks in the control cavity wall, I made a turnbuckle from a bit of threaded rod in a hex connector. A scrap of wood and a half of a dowel protected the body while I cranked it open just enough to flood the cracks with hot hide glue. I used some thinned-down glue first, so it penetrated deep, then followed that immediately with normal viscosity.
Threaded rod and a matching hex connector made a small turnbuckle to expand th control cavity's cracks for gluing.
Test on scrap
This technique is new to me, so I tried it out on some scrap a few days ago. If you’re taking a leap of faith on a new idea, don’t do it first on a customer’s guitar!
Here’s a neat trick:
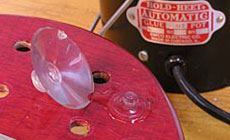
I pumped glue into some cracks by pressing on it with a small suction cup like the one holding the thermometer on my kitchen window (which I promise to replace before Joan gets home). I let the hide glue dry overnight.
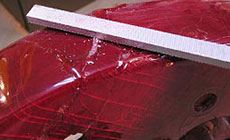
Clear red epoxy drop-fills
The next morning, I scrubbed away any hide glue residue using a rag dampened with hot water, then left the guitar to dry again for several hours. For smaller finish repairs, I often use what I call a superglue drop-fill technique. This situation was different: for these large chips and deep cracks, I used slow-set epoxy. The slower working time and thicker viscosity were suited to this job. And I tried something new: by adding red/brown stain, I had a gap-filling repair that blended right into that Gibson red finish.

I placed a drop of ColorTone cherry red stain on a yogurt cup lid and mixed a tiny bit of medium brown into it. With a pipette, I laid out a small pool of acetone as a vehicle to blend the stain into the epoxy.
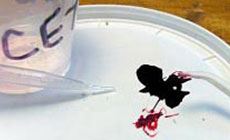
I used very little color and very little acetone, lifting the glue off the lid with an angled drop-fill toothpick and adding it to my already-mixed epoxy. With the toothpick, you can pick up and move the epoxy, even level it a little while it flows into position. Burst any air bubbles (they look like tiny sharp points deep down in the glue), and let it dry for a minimum of two hours. I try to fill a crack with a single application, but some of these canyons required a second coat. That worked fine, and it didn’t leave a visible line between the two applications of glue.
After the fills dried overnight, I leveled them with nut and saddle files — using each grit in order, and stopping before hitting the surrounding finish with a file. I followed up the filing with 320-grit gold sandpaper held on a rubber sanding block with double-stick tape. I also used the 320-grit on a flat board when needed to knock down particular high spots.
Last step: crack it up again!
After fine-sanding the work area up to 2000-grit, I buffed it smooth with medium buffing compound, and then swirl-mark remover. My new finish fixes weren’t quite done: all the old finish around them was checked with age — filled with a spider web pattern of cracks. By scratching with a sharp X-ACTO point, I added checkmarks to make my new work fit in with the old. A quick polish (without silicone) and I'm done!


