P-90 Pickup Kit with Modern-style Bobbin
Assembly instructions for the P-90 pickup kit with modern-style bobbin.
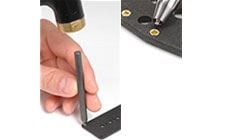
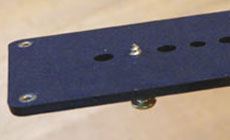
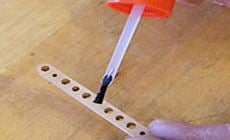
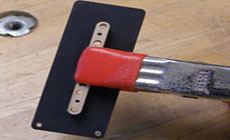
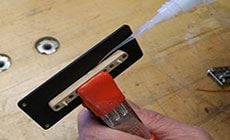
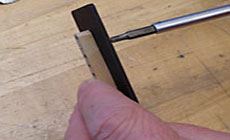
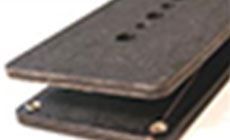
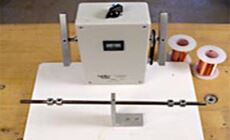
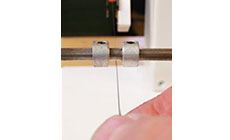
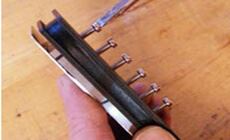
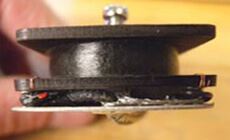
Gibson's R&D team designed the P-90 in 1946 and it was the most common pickup used on the company's guitars until the PAF started appearing on production instruments in the late 50s. The P-90 pickup is a punchy single coil with a fat, warm sound and a great high end response that is still used by Gibson on a number of models to this day. In recent years many boutique pickup builders have started making custom versions of the P-90 using flatwork similar to that used on Fender style pickups. The result is a professional look that retains the traditional characteristics of the pickup. These tools and supplies are recommended to assemble your kit. Where applicable, item numbers for ordering from Stewart-MacDonald are included. StewMac has lots of free technical literature online at stewmac.com/freeinfo. One instruction in particular, Pickup Winding with the Schatten Pickup Winder, has helpful tips on troubleshooting, technique, potting, remagnetizing a pickup, and pickup specifications. A great reference for building any type of pickup! Smooth, and slightly round the edges of the fiber flatwork with very fine sandpaper to remove any roughness that might catch the thin wire during winding. On the bottom piece, countersink the underside of the hole, to better fit the eyelet and allow it to expand and grip more securely. Insert the eyelet into the underside of the flatwork. The small end of the eyelet will be facing up for setting. Setting the eyelet curls and spreads the brass, creating a flange that grips the flatwork. Before setting, back up the eyelet with a solid surface such as aluminum or steel. (Wood is too soft to provide a proper backup.) We highly recommend an eyelet setting tool for a clean, consistent installation. Take the two brass screws used for attaching the baseplate and thread them through the bot- tom piece of flatwork so just the points are exposed on the other side. This helps to align the wooden center of the bobbin during assembly. Using a brush, apply a light coat of medium viscosity super glue over one side of the wooden bobbin center. Use care not to gob it on a clog the holes. A light coat will be sufficient. Moving quickly, place the wood- en bobbin center on the bottom flatwork piece using the screw tips as indexing pins and hold it in place with a spring clamp. Then tighten the brass screws all the way down to make sure to get good contact all the way around. Then take the super glue and make a "fillet" between the edge of the bobbin center and the bottom of the flatwork and hit the whole thing with Accelerator for a quick cure. This adds extra strength as well as prevents the windings from working themselves between the flatwork and bobbin center. Once cured, remove the screws and spring clamp and repeat the process for the top piece of flatwork. Thread the coil wire through the right hand eyelet from the top and wrap it through the eye several times to secure it. Gibson wound their humbuckers on machines, which means the traverse and layers of the windings are very consistent. You can experiment with winding very methodically to replicate "machine-wound", or "scatter-wind" your coils. The number of turns will affect the pickup's tone and response. More wraps will give you higher output, and more midrange punch. Fewer wraps will give you a more open sound with greater high-end clarity, but less output. Attach the bobbin to your winder. Traditionally P-90 coils were wound counterclockwise (when viewed from the top of the pickup) with 10,000 turns of wire. Set the "traverse limiter" on your winder so the coil wire stops about .020" from the flatwork on both sides. This helps prevent the windings from deforming and gives a more uniform looking coil. If you have a winder with a counter, set it to zero. Start the first 6-10 wraps turning the winder by hand to seat the black lead wire and insure that the coil wire won't be pulled off of the bobbin when you start the winding. Though not a traditional feature on the P-90, many players prefer to have one pickup wound with reverse wind/reverse polarity to allow for hum canceling when two single coil pickups are combined. On a P-90, wind both pickups counter clockwise but connect the braided shield lead wire on one pickup opposite of the other and attach the magnets with opposing polarity. Once you've achieved the desired number of windings, carefully cut the coil wire and solder it to the red lead wire so it extends about 1" the out of the finish wrap hole on the same end of the bobbin as the start "black" lead wire. Wrap the coil several times with 1/4" wide pickup tape to secure the lead wire and protect the coil wire. On a P-90 the ground lead is the start and the finish wrap is hot. Attach the black wire to the start wrap, the red to the finish. At this stage install the polepiece screws in the bobbin so they stick out of the bottom about 1/8". When inspecting the nickel silver baseplate you will notice that the holes are slightly rounded on one side and flat on the other. With the flat side down solder black start hookup wire and the outer braided shield of the lead wire to the baseplate and feed it through the hole in the baseplate. Connect the red finish wire to the inner black "hot" of the lead wire and insulate the joint with paper coil tape or heat shrink tubing. Attach the keeper bar with the rounded side down then install the magnets, South orientation at the polepieces is traditional for vintage P-90s. Then carefully align and attach the baseplate to the bottom the pickup and tighten the polepiece screws the rest of the way down. Carefully tuck the lead wires in the space between the baseplate and the bottom of the bobbin. Test with a volt/ohm meter set to the 20K range. P-90 pickups traditionally read in the low 8K range. If you get an open circuit: are your connections to the coil wire good? Did you solder a break inside the coil which is now causing a short? Potting a pickup (dipping it in melted wax or other material) is a technique used to help eliminate unwanted microphonics. Some pickups, including vintage P-90s, were not potted from the factory. While it's not necessary, potting is generally a good idea. Wax is a traditional pickup potting material that works for most pickups, it's non-toxic, easy to deal with, cheap, and you can undo it if something goes wrong. Danger: If the wax is too hot you can warp or melt plastic bobbins. If the wax is way too hot you have a potential fire on your hands! Make sure that the wax never smokes—that's an indicator that it's getting too hot. Never try heating your wax on the kitchen stove or in a microwave oven because hot paraffin, and especially paraffin vapors, can ignite. It's best to wax pot outdoors until you have your methods refined and have eliminated any fire hazards. Stewart-MacDonald's Hot Glue Pot has a thermostat designed to heat hide glue to about 145°. Keep the pot at least 2/3 or 3/4 full. It can operate with less liquid, but the wax may get too hot. Application: After a pickup has been wound, and the output wires are attached and assembled, suspend the pickup in canning paraffin mixed with 20% beeswax, heated to 145-150° Fahrenheit. After ten or fifteen minutes all of the bubbles should have risen out of the pickup, and all of the voids within the pickup should be filled with a coating of wax. Pull the pickup out of the wax and suspend it over the wax pot letting the excess wax drip back into the pot. Then lay the pickup on a paper towel and allow it to cool to touch. Carefully remove any excess with a paper towel before the pickup completely cools to room temperature.
Recommended tools, supplies, resources
Prepare the flatwork
Assembling the bobbin
Winding the coil

Attaching the lead wires
Final assembly

Testing the DC resistance
Potting
