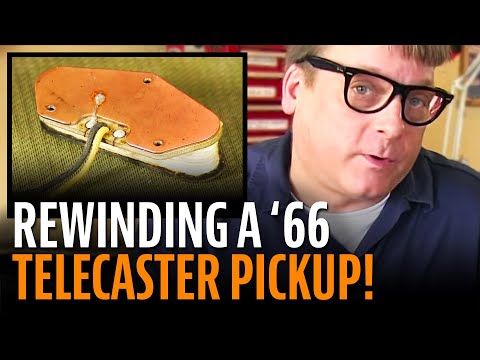
1966 Telecaster pickup torn down and rewound
Issue 199 September 12, 2013
Erick Coleman has a 50-year-old pickup that's nearly dead: It's making a little bit of sound, but not much. Erick opens it up to find the trouble, and we get a good view of the guts of this vintage Fender pickup before he rewinds it.
About the pickup in this video: This is a 1966 Fender Telecaster pickup, made during the years when the company wax-potted some pickups but not others. This one has no wax potting; so the string wrap and coil wire come off easily.
- Tap-testing the faulty pickup compared to a healthy one
- Visible damage revealed under the string wrap
- Unsoldering the leads and unspooling the bobbin
- Lacquer-dipping the bobbin before rewinding
- Rewinding with the same kind of wire Fender used in '66
Video Transcription
[on-screen text reads: Erick Coleman - Stewart-MacDonald]
Erick Coleman: Last January, I met a guy named Dave Gleason at Deke Dickerson's Guitar Festival in Anaheim, California. Dave and I struck up a friendship and after a while he sent me this 1966 Fender Telecaster pickup for a rewind. It'd been giving him trouble, and not really sounding right. So I'm going to see what's going on with this thing. I've hooked it up to the meter [on-screen text reads: Compact, versatile multimeter - Fieldpiece Digital Pocket Multimeter from StewMac], and the reading's very erratic, so that gives me the indication that there's something wrong internally. Now when I hook it up to an amplifier, I get a sound, but it's really weak. Especially when you compare it to a pickup of the proper output. Hear the difference there?
Now, before I go peeling off any string or coil wire off this bobbin, I'm first going to heat up these two little solder joints right here. Maybe they've gone cold over the years, and just need to be reheated to work again. Sometimes this works, sometimes it doesn't. But it's definitely worth it, because it saves you a bunch of time with rewind stuff and it also keeps the pickup original.
Identifying the problem
Well, heating up the solder lugs didn't do any good, so we're going to have to dig in and see what the problem is. Now I'd like to point out that this pole piece, is very, very rusty. And there's a good possibility that it had something to do with what caused this pickup to malfunction. And a lot of times when I peel the ground plate on these, I can see the tape, holding the pole pieces in, and it might be all rusty. This looks pretty clean though, so it doesn't look like the rust went all the way through. So my first step is going to be to peel this string off, and then examine the coil.
Removing the string
Almost all Fender pickups were potted with lacker or wax. But during this particular period, some snuck out of the factory without anything at all. And now looking at this string, it's soft and moving. And so are the coil wires, they're not stuck to the base plate, the bobbin there. So that tells me that this pickup has not been waxed at all.
So I'm going to carefully remove the string. If you look at the bobbin real well, you can kind of see where it ends up, and so I'm going to hook it with this tool, and just gently work it out. And here we go. There's the end of it. And since it's not potted, this is just going to unwind off of here fairly easy.
Inspecting the coil
Okay, now that I have the string off, I'm going to just inspect the coil and look for any visual signs of damage that could have been the problem. So, just kind of give it a good once over. Now that I'm looking at it, I see something a little strange. There's a little crease right in here, that looks like maybe a guitar pick or something slid between the protective string, and possibly damaged the coil. So what I'm going to do, is find the finish wrap of the pickup, which is this one here. I'm just going to pop this up with an X-ACTO, cut it, and start unwinding it by hand to see if I can't wind through this weird little part I see.
I'm just going to start carefully pulling it off. And eventually I might come up on a break here. This is pretty time consuming, you can spend hours doing this. But while you're doing it, pay attention to the layers because it's often a good education to see how this coil wire was wound onto the bobbin and layers. This one was obviously done very, very evenly.
Cutting the wire
After unwinding a bunch of this coil by hand, I never did expose a problem, so I'm just going to go ahead and cut the wire off now. Using the sharp knife, an X-ACTO works great, just carefully work in, and just start bringing it down. Work from the bottom up to the middle, and the top down to the middle so you don't go marking up your flat work. Now notice I cut, right around where that rusty pole piece is so I can see if there's anything going on regarding it, in the area that I've removed this wire.
Now I'm not seeing anything that indicates to me that the corrosion was the issue. The pole piece looks pretty clean under here, we'll look at it once I get all the wire off. I'm just guessing that little divot that we saw on that coil, broke it deep down in the... Inside the center of the coil. We would've had to unwind well over half the bobbin to get to that point.
Yeah, these look pretty clean. If you look at them, there's not much rust or anything on them. It's going to be easy rewind. So at this stage, we're going to need to take the lead wires off, and the copper-plated steel base plate, and clean this bobbin up for rewinding.
Now I've clamped the bobbin into a small parts vice [on-screen text reads: For when you need a small vise - StewMac Nut and Saddle Vise] just so hold it steady, while I remove these other leads. I heat up the solder from the backside, and just pop it right out like that. Now the ground lead is going to be a little longer because it had that little tail that went into the grounding plate there. All right, there we go. Pull those out the bottom side, and grab my Solder Sucker. Might take a couple times to get them good and clean. Some really old solder in there. I come in with my X-ACTO. I'm just going to cut away these little remainder start wraps of the lead wire.
Cleaning the bobbin
Okay, now that I have all the lead wires and the grounding plate off, I'm just going to clean it up a little bit, before dipping it in lacquer to insulate it. The idea is to just remove any kind of sharp edges or any kind of area that might catch the wire. Go around the bases of the edges of the pole pieces a little bit.
Finishing the bobbin
And then the final step we're going to do is dip this bobbing in lacquer to seal it off. It's only going to take a minute, and I'm using a bent piece of fret wire as a handle. Now I'm going to take this to the spray room, and let it dry overnight.
Cleaning the pickup
This bobbin's been drying for a few days now, so I know the lacquer's good and cured. I'm going to take this X-ACTO, and scrape off any of the buildup around the lips of the edges of the pickup itself. This just helps prevent any wire from snagging on anything, and this gives it a good smooth look. Now with this pickup man, I was really convinced that the problem was going to be related to rust on the pole pieces and corrosion of the enamel wire, but I was really surprised that it wasn't, and it looks like just the coil got damaged, and that's why this pickup failed.
Rewinding the pickup
We're ready to rewind this. Now in early 1964, Fender switched from Formvar wire to plain enamel. And it's clear when we took the wire off that bobbin that it was plain enamel, you can tell by the color, so that's what we're going to rewind this with [on-screen text reads: Wind pickups like a pro - Schatten Pro Pickup Winder from StewMac].
[Erick attaches the pickup to the pickup winder and starts rewinding the pickup]
Checking the date
I'm winding the string on, just exactly how it came off the bobbin. Now I'm going to put the base plate on so I can solder the lead wires and... Check out the date. 7/28/1966. This guy just turned 47 years old. Pickup's ready to go, It's reading in the mid 5K range. Perfect for an old Tele pickup. Dave, this will be on the brown truck tomorrow.


