Bridge fitting for archtops
How to fit, sand, and install bridges on archtop guitars and mandolins.
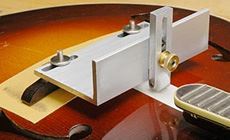
The Stewart-MacDonald Bridge Fitting Jig is for use with a two-piece "floating" bridge for an archtop guitar or mandolin. It holds the bridge base while the bridge feet are sanded to match the instrument's top curvature. 1. Remove the bridge's top and thumbwheels. Insert the bridge's threaded posts into the slots on the Jig, and reinstall the thumbwheels. Center the bridge base on the Jig, and tighten the thumbwheels to hold the bridge base firmly. Set the assembly on the top of the guitar or mandolin, and adjust the Jig thumbnut to set the angle of the bridge on the instrument's top. 2. Attach medium-grit sandpaper (or the grit of your choice) to the top of the instrument in the area where the bridge will fit. We prefer adhesive-backed paper, but double-stick tape can also hold the sandpaper. Note: Reduce the strength of the adhesive by placing the sticky side against your T-shirt or other cloth apparel. As the tape picks up lint, the tack of the adhesive is reduced. This is essential to avoid removing finish from the top, especially on older instruments. 3. Place two or more strips of masking tape (reduce the tack as described above) on the instrument under the guide wheel, to avoid finish damage. The tape thickness should approximate the thickness of the sandpaper. 4. Scribble the underside of the bridge feet with a white lead pencil, and use the Jig to sand the bridge feet. When the white markings are nearly removed, use increasingly smaller strokes for a perfect fit. 5. Remove the bridge base from the Jig. Carefully remove the tape and the sandpaper from the instrument, and recheck the fit of the bridge feet. The arch of the bridge feet should now match the radius of the top perfectly.