Final-shaping a D-18 or D-28 style guitar neck
Building a D-28 style guitar, or a D-18 style? Either way, here’s how to final-shape the neck. Guitarmaker Todd Sams manages our woodshop on Banjo Hill here in southeast Ohio. Todd directs the production of StewMac guitar necks and uses the necks on his own Sams Guitars—so he’s the best guy to ask: Todd’s answer is, “Both, if you know these two tips...” When I’m building my own guitars, every neck starts out as a StewMac 14-fret dovetail model. We make these necks in small batches, and we’re fussy. By the time a neck is ready for our customers, it’s almost exactly what I want for Sams guitars. These necks are designed to give you some final shaping options. The very last steps are left up to you, so your instruments are truly your own. Sometimes I’ve seen finished guitars with our necks shaped just the way they left our production shop.
You want to add a little bit of shaping to get the perfect neck for you.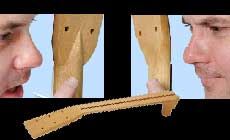

Are StewMac necks designed for D-28 or D-18 style guitars?
That “almost” is what I want to tell you about:
That’s not the idea!
The most noticeable difference between a D-28 and D-18 neck is in the shape where the back of the neck meets the peghead. It comes down to a few chisel strokes and some filing that takes me about twenty minutes:
D-28 Style
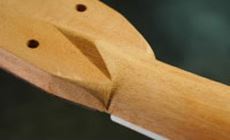
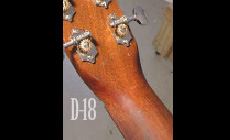
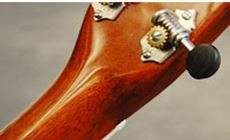
A Martin D-28 neck has a “diamond” or “dart” shape where the back of the peghead meets the neck. We’ve machined this shape for you on our necks, leaving a little extra wood for wiggle room in making it the way you like it.
If you want the D-28 style, sharpen your chisel really well and let’s go:
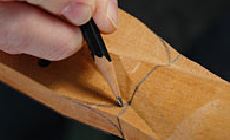
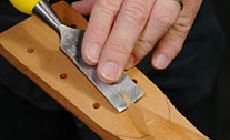
With a pencil, draw these lines showing where to remove wood. My first line is across the neck, from side to side behind the nut. Then I mark where the peghead sides will curve in to meet the neck.
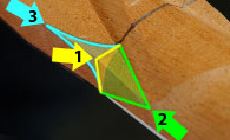
Three chisel cuts create the shape. (Each cut takes multiple chisel strokes as you shave away wood.)
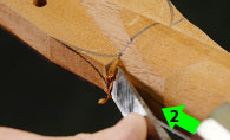
1. First cut straight in from the side (indicated with yellow) to set the depth for the next two cuts.
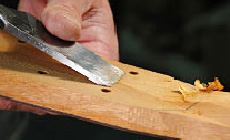
2. Remove the square edge where the neck approaches the peghead, following the round shape of the neck (shown in green).
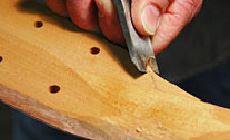
3. Last, cut the curved shape that blends the peghead and neck (blue).
Here I’m making cut #2, working in light strokes so I don’t dig in too deep. I’m following the round neck shape as it meets the flat surface created by my cut #1. The neck is being held by the Ultimate Vise.
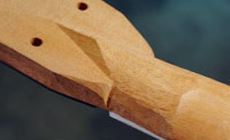
A few minutes later, I'm done with the chisel and I have a rough D-28 shape. It’s time for a rasp.
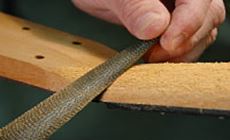
A coarse Dragon rasp smoothes the chiseled edges, and the neck’s ready for smoothing and sanding (more about that below).
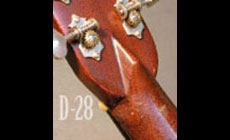
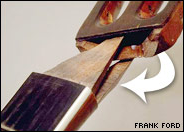
"Dart?” “Diamond?” “Volute?” What’s that lump?
Most folks assume that shape on a Martin D-28 neck is needed for strength. That was true long ago, but nowadays the dart (as Martin calls it) lives on as part of the beauty a D-28. Early Martin pegheads were attached with this elaborate joint, but today Martin makes necks like we do: from a solid billet of mahogany. (Thanks to our pal Frank Ford for this photo.)
D-18 Style
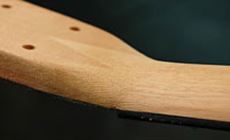
A D-18 neck is simpler, without the dart on the back. The line of this neck gracefully blends into the peghead.
For this shape I start with the neck clamped in my shop vise with the back of the peghead level. With a sharp chisel, I shave away the diamond.
I've penciled-in the shapes where the peghead will merge into the neck (for this, you'll need to refer to an actual D-18 or photo books). With the chisel I carefully shape the curves where the back and sides of the peghead meet the neck.
The rest of the shaping is just like working on the D-28 style. The rasp shapes it quickly, and I'm ready for smoothing/sanding.
Final smoothing and sanding
I lay the edge of a 6" steel rule on the surface to help me see high or low spots, then clean them up with a fine Dragon rasp followed by a half-round file from the hardware store. The flat 00-cut file from our luthier’s file set provides the final smoothing before sanding.
When I’m satisfied with the shape, I sand with Stikit Gold paper, working through the grits. I fold a 6" piece in half with the two sticky sides together, and that gives me a sanding pad that’s easy to hang onto.
Those are the steps I use for final-shaping the volute area on a Sams guitar neck. There are subtle differences in the neck and heel shapes too, but we’ll have to wait for a future issue to talk about those.
Take your time and enjoy the work, and you’ll have a neck that looks and feels just the way you want it.
The result: one of my Sams necks, D-18 style. This started as the same StewMac neck that comes in our guitar kits.


