3 tips for cutting finely detailed custom inlays
I’m cutting pearl in the shape of a curvy letter “L” to be inlaid in a fancy wooden guitar stand. Here are three tricks that helped me do it. This pearl inlay will be in the shape of a script monogram “L” that my friend Tim drew with a felt-tip pen. It’s going to be a spidery-thin piece when it’s done, and these tips helped me cut it to the shape Tim wanted. These holes give you a place to insert the saw blade and start cutting on closed areas, as well as several “rest stops” during long cuts. I try to see the shape as a series of easy cuts rather than trying to freehand one long and fancy outline. Pearl has grain that can cause the saw to veer off the intended cut, so focus your attention about 1/4" ahead of the sawblade and saw toward that. Don't let the saw cut into the inked line; leave a little extra pearl and file it away later. I'm using a fine blade (51 teeth per inch), and lubing it frequently with cutting lubricant. Do this before you start drilling or cutting. The wood supports the pearl through all the sawing and shaping. When you're ready to inlay, the wood comes off easily: just soak the piece in hot water to loosen the hide glue. (Thinned-down Titebond glue will also work.) Here I'm cleaning up my saw marks with a needle file so I have a smooth edge all around.

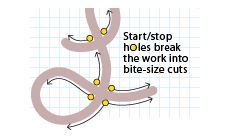
Tip 1: Drill start/stop holes at several points around the inlay.
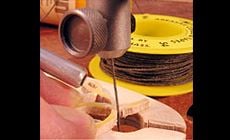
Tip 2: Mount the pearl on a wood backer board with hot hide glue.
Check it out!
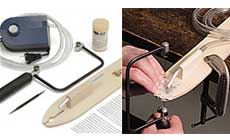
Pearl Cutting Outfit
Our own keyhole-style cutting platform plus dust-blowing air pump, tracing scribe, cutting saw with blades and cutting lubricant. Let’s get started!
Tip 3: Turn the pearl cutting saw into a super-fine detail sander.
Use the pearl cutting saw to smooth corners by replacing the blade with abrasive cord. Squeeze the frame together and thread a piece of the cord into the blade clamps. I wet the ends of the cord with #10 super glue and harden them with accelerator. I'm not gluing the cord into the saw, I'm just making the ends tough enough for the saw clamps. Clamp the cord in, let go and BOIIINGGG! you’ve got a detail sander!

I had great vision when I was a 30-year-old kid, but when I turned 40 I learned that 40 does not equal 20/20. Closeup focusing gets tougher as my eyes get older, but I’m not ready to use that as an excuse for sloppy work. I use an OptiVISOR to see the work better. (Probably if I’d known about this when I first started out, my early work would have been better.)

I use this thing so much that I leave the shop and forget I’m wearing it. It used to make my friends laugh, but now they're all wearing ’em too.
Maybe I’ll start an OptiVISOR Club!
These guys’ll be at the first meeting:

- Michael Stevens, Austin TX,
- Roger Sadowsky, NYC,
- Joe Glaser, Nashville,
- Dale Trach, C.F. Martin pearl inlay artist,
- Don MacRostie, StewMac research/development chief,
- Todd Sams, StewMac production shop foreman,
- Al Rorick, StewMac head machinist,
- Erick Coleman, StewMac tech support whiz.
Notice that Michael Stevens is wearing double lenses? That's a modification Mike and I made to our O’visors. Here's why:
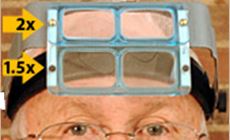
The OptiVISOR lens has 2x magnification — good for medium-close work like pearl cutting, inlaying, engraving and fret-dressing. It has a 10" focal length (and that’s about how close my nose is to the work as I use it). I like to have the option of a broader view too; for this I switch to the optional 1.5x lens.
I got tired of changing lenses, so I rigged up this double-header. It’s a bracket that holds both lenses at once.
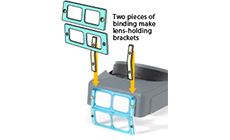
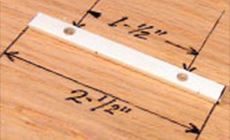
You can make one for your OptiVISOR using scraps of plastic binding. Cut the strips and drill holes as I've done here. I used a 9/64" bit.
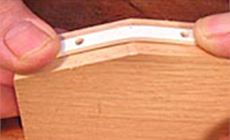
Heat the strips with a hair dryer or heat gun to soften them, and then bend them over an angled block cut to about an 18° angle. Hold them until they cool.
Half-inch bolts hold the top lens and brackets. The bottom lens is held with the visor’s snap pins.
I use the 1.5x lens most. I put it on the bottom and the 2x lens on top. Modify your OptiVISOR like this, and you’ll use it so much that...
Well, don’t blame me when you start walking around wearing it. Welcome to the club!


