The HeatStick: remove glued necks with no damaging steam
V-0551
The traditional way to release a glued neck joint is by piping steam from boiling water into the joint. That much water damages delicate finishes, and can loosen braces and neck blocks. That's why we've developed the HeatStick.
Video Transcription
[on-screen text reads: StewMac tools + ideas for guitarmaking]
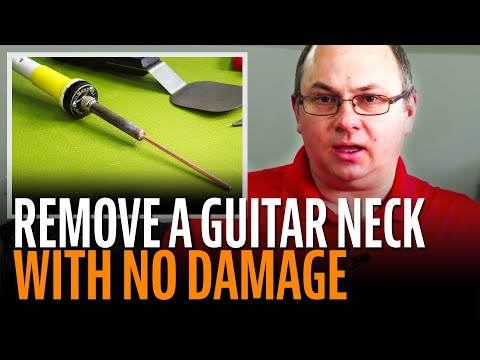
HeatStick for neck removal
Todd Sams: Years of string tension will take their toll on the guitar body. At this point where the neck meets the body, the joint will actually stay solid, but the body will shift over time from that tension. As this happens, the strings will come up causing a high action. The first fix for that is typically to take down the saddle, and as years go by and the saddle gets too low, if someone hasn't done a neck set, then the bridge usually gets lowered. It's not the optimum fix, but it does happen a lot. In this case, we need to take the neck out and reset it and then afterwards the bridge will get replaced also.
The traditional method of removing the neck at the neck to body joint has been to use steam. A couple of the drawbacks to that are one, you could blush the finish if you're not careful, and two, any loose joint is going to allow steam to shoot out from there and it's hard to control as you're trying to remove the neck. The HeatStick does this job without the steam. Ian Davlin is the guitar repairman who thought up this dry method. Ian was using a bulky power supply. Then Gene Imbody hit on the idea of simply using a soldering iron. The HeatStick is made of tempered 182 copper and fits into the iron just like a replacement soldering tip.
Loosening the fretboard extension
You have the long stick for deeper body guitars such as dreadnoughts. And you have the short stick for your archtop guitars. Shallow body thin lines, you can use this on a mandolin and also a much more difficult job, but it can be done with the stick is the 10N necks of an SG and a Les Paul type guitars. I'm going to start off by loosening the fretboard extension. So I'm going to put a couple of protective pieces here and put a heating iron on [on-screen text reads: Bridge Heater & Fingerboard Iron - stewmac.com]. Give that a little time to warm the fretboard. Okay, I think we've got sufficient heat.
I use a thin Pallet Knife to get under the fretboard. Some are a little more stubborn with the release of the glue. Going to slowly work the knife under. You don't want to force anything. Then you start diving down into the grains of the wood. Be careful of the pickguard too. You don't want to catch that with the knife. Little bit holding at the end of the dovetail. Okay, so the tongue is loose.
Removing a fret to gain access to the dovetail glue joint
I'm going to remove the fret now to gain access to the dovetail glue joint. In the case of this guitar, it's a 12 fret to the body guitar, so I'm going to have to remove the 13th fret to gain access on a 14th fret guitar. You're going to shoot for the 15th fret. I'm going to take my iron and apply heat just to let it come out cleanly. Keep it on long enough until you're sure that the frets heated up. Probably ready now.
Drilling an access hole to the neck joint
So now we've got access to drill the hole. And what you're looking to hit is this gap between the male and female part of the dovetail joint that falls almost directly below this fret slot. When I come through the fretboard, I'm going to stay about a half inch from the center and you want to basically follow the angle of the dovetail. If you came in straight, then you're going to end up drilling into the side of this dovetail block. We'll start with a 3/32 bit. That will allow us to find the actual gap in there and I'm going to drill at the start in reverse. And once it's cause the divot, that should help keep the chipping down.
As it went through the fretboard, I felt it release, which tells you, you've hit the air gap. Some guitars actually do not have a gap. If you don't find that, don't worry about it because that's the beauty of this HeatStick is that it will radiate the heat out into the dovetail joint. Now we're going to follow this up with a 144 thousandths bit that allows the access for the HeatStick. I will put a piece of tape three inches up on the drill bit. This will give us a visual stop as we drill down through the fretboard. Remember to go backwards first. You're looking for that roughly 15 degree angle. Okay, we should be good to go with the HeatStick. Okay, we're going to mount the Neck Removal Jig to the guitar body.
Using the HeatStick
At this point, we're ready to add the HeatStick. You want to insert it into the hole through the fretboard all the way down to the bottom.
Then we're going to wait a few minutes and let that warm the joint up. Okay, we've let the heat settle in for five minutes or so. I'm going to put a little bit of water in the joint with a pipette. It's not enough to make any steam. It will let you know as you're loosening the joint as you'll get some water droplets down on the bottom here. And that tells you that it's starting to loosen the neck joint, which is allowing that water to get through. And I'll start working the body semicircular motions to see if I can get any gap to start. And you want to be patient. You can see how much movement we're getting. We're getting close. I can see a good gap all the way down the neck to body on this side. And I believe on this base side we're getting the same thing, so I'll just keep working it. Put a little tension on the heel, which helps force the neck up out of the body. I'll go ahead and take the iron out now.
There we go. Let me see. It came out clean. Nothing broken on the dovetail, so no steam to worry about. No blushing of the finish. And that's about it.


