A kitchen cutting board makes a great binding jig!
Issue 195 July 18, 2013
Dan Erlewine modifies a plastic cutting board from Walmart to solve a guitar binding problem. He needs four matching pieces of black-white-black binding, and he shows a clever trick for doing this. From the free Trade Secrets newsletter at stewmac.com
- This idea came from mandolin maker Don MacRostie
- Hot Tip! Heat-forming the tight curves before any gluing
- Hot Tip! Make-it-yourself tool for perfect miter joints
- Cleaning the binding with sandpaper and scrapers
Video Transcription
[on-screen text reads: Dan Erlewine - Stewart-MacDonald]
Binding jig idea from a Mandolin maker
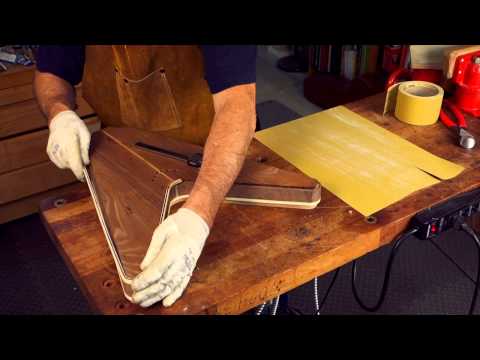
Dan Erlewine: My friend, Don MacRostie, makes Red Diamond mandolins, A-style and F-style. Nothing has a tighter curve than the scroll of the binding on an F-style mandolin. When Don saw me binding the solid body and trying to get around the tight curves, he showed me this binding trick. This was a gluing jig. It's a nylon breadboard or a cutting board from Walmart. I routed a slot in it that accepts my pieces of binding. Then I drop them down in here, three pieces separate into the groove. My groove is 200 thousandths wide and 7-32nds of an inch deep. That's the size binding I want. I take the raw strips and put them in the slot and when I get to the corner I heat it with a heat gun and it just gets supple and I can bend right around the curves and I press it down in to dry.
Cool really. Takes me a couple of minutes to get those plies done in the slot, bent around the curves and trim the length. Isn't that sweet? Once they're cool, they come out. They're not glued together, but they're right to the perfect shape and then I put them back into the jig and use acetone, brushing it on the plies to glue it together. The acetone swells it up a bit, so it's a tight fit coming out and I've got holes in the bottom of the slot so I can tap it out at key points. There we go.
Cleaning the binding with sandpaper and scrapers
It's glued in. It's solid, ready to go on and probably the hardest part of it was to make a very accurate shape of my body that's just the right size to be small enough to account for a ball bearing router bit going around to make the exact size slot. It was really worth it to do that because you need four pieces like this to do one of these bodies, two on the front and two on the top. This is gold stikit sandpaper, 120 grit [on-screen text reads: 3M Stikit Gold Woodworker Set of 3 from StewMac]. And I'm using that to get the squeeze out off the inside and the outside. There's always going to be a little glue and I especially want to use it to flatten the bottom gluing edge. I don't care about the top. It's going to be sticking above and kind of crooked. I want this edge nice and level on the same plane, so it all sits right down into that channel like it should. And I'll run a scraper down it too because the scraper will feel any bumps [on-screen text reads: StewMac Ultimate Scraper - Nothing beats a good scraper].
Cutting a miter joint
That's good. Scrape that corner and that's going to be ready to fit and glue on. Where each piece of binding meets you need a miter joint. These two will come right out on the point at the cutaway. So I'll pencil a line right across the right angle and chop it back with the chisel and I'll do the same thing with a little piece of this. You can't cut too much plastic at once because it's hard and thick, so you have to nibble it by degree. I'm going to nibble up to that pencil miter line. I'm also trying to keep it very square from top to bottom because if the bottom is shallow at an angle or the top, the joint doesn't come together and look good. In fact, when I get to the final cut, I like to stay a little bit shy of the pencil mark and leave it long because it'll mush together with the glue.
DIY tool for perfect miter joints
And here's another way to do it that I think is way better if you have a drill press. What I have is the plane blade from a little push plane notched into this wood dowel and epoxied in place with a brass rod in the other end. I drilled the hole and pressed that in there and it goes into the drill press that gives me the perfect little miter cutter to come down at 90 degrees to the table and do that cutting with accuracy. Those would be tough to get for me, anyway, without having that jig to prebend it and laminate those pieces ahead of time.


