Dan Erlewine's tips for shaping a guitar neck
Issue 281 March 09, 2017
Joe Etgen is building a guitar for the first time, working down in his basement. Working alone on StewMac's Triple-O kit, he's got the body and the neck in good shape. We asked Joe to take the guitar to Dan Erlewine's shop for a look-over. Dan shares some tips you'll want to know when you build a guitar sometime.
- How to use another guitar to check your work.
- Neck-shaping gauges you can make.
- Razor blade trick for removing sanding scratches.
- Getting from “almost right” to the neck shape you really want.
Video Transcription
[on-screen text reads: Final Shaping a guitar neck - StewMac]
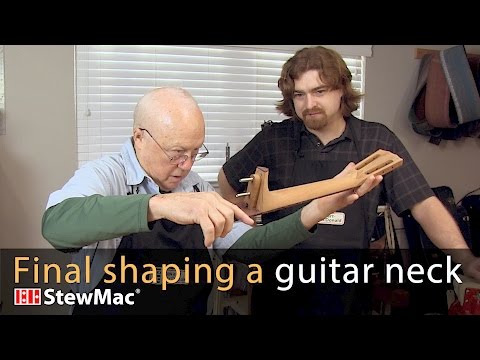
Dan Erlewine: Here's Joe Etgen, my friend and coworker at StewMac. He works in the phone room, helping customers.
[on-screen text reads: Final shaping a guitar neck. Dan Erlewine Guitar Repairman, Author.]
What do you have here, Joe?
Joe Etgen: This is my first acoustic guitar build. It's our Triple O Kit and it's coming together pretty well.
Dan Erlewine: This is ready to spray. He's got a sealer coat on the top, sanded, flat sanded, and all the bumps are gone to 320 grit. Now he has the job of catching the neck work up to the body work.
Joe Etgen: We actually get a few calls every once in a while about putting the final profile on the neck here. And making that nice and smooth on the top of the headstock. See, I got a few scratch marks on there.
Using another guitar to check your work
Dan Erlewine: From a drum center, probably. We can scrape that out and right here, that volute, I call it a diamond. You're going to want to knock down these sharp edges and bring that heel in. There's a little lump here, see this little dip? The light part is a hump and this comes to a valley. As a matter of fact, I've got an old Martin guitar in here, 1942, that this is almost exactly like. And you can use that to look at while you're shaping this.
Joe Etgen: Oh, that'd be great.
Dan Erlewine: I'll go get it and actually I have a little surprise for you too.
Joe Etgen: Oh, wow.
Dan Erlewine: What a beauty 00-42 in 1942.
Joe Etgen: A piece of history right there.
Dan Erlewine: Lay her down very carefully here and then look at the neck. The volute is much rounder and smaller. Sharp, round. You can see the Martin line coming up at right angles to the fretboard. You've already got it marked out, but there's a lot of wood you have to take off to get that. You want to develop a line in your heel so you can see this point coming gracefully down and blending into the round. You got to lose some wood here.
My present that I talked about is, that I made you a little set of neck shapes. With some automobile bondo, or it's polyester body filler. It won't be perfect for you because this neck is wider than yours. You made yours narrower because that's your customization. They're not fitting well because there's too much wood on these edges, right in here. That's got to take a lot of wood off that and blend them down to this end, which is closer to the actual shape. And you've got the tools here to fix it. So good luck to you.
Shaping the guitar neck
Joe Etgen: Let's get to it. All right, so I'm starting out by just marking out a few areas that we need to remove more material from. Then I'm going to come in with my course wrap [on-screen text reads: stewmac.com - Dragon Hand-cut Rasp]. Probably won't need to use this too much because it really removes a lot of material. Skinnier up here on the heel cap. It's a nice taper and smooth, I like that. Mine is a little bit fatter on the heel cap with these [inaudible 00:02:58] leave it some lines.
So I'm going to move on down to a finer file. Actually these are out the luthiers final sets [on-screen text reads: stewmac.com - Luthier's File Set]. This is a half round file. It's actually a half round bastard file. It's a lot finer teeth, you can see that it leaves a nice, smoother cut. It'll be easier for sanding. Going from the fingerboard right here you can see that pencil line going straight around the neck here and blending it all together into the volute.
Dan Erlewine: Your file coming around, took a little bit too much wood off. And you're getting some marks in here because you're being a little timid about going at it. I would be inclined to come in with a fresh sharp knife and make a cut mark. Not all the way down, just enough that I could come in with a little chisel and chisel that line a little bit. Now you can file from up there, get into your cheek.
Razor blade trick for removing sanding scratches
When you move some of this wood away, that's easier to attack that part. So if you want to get rid of these drum sander marks going across the grain, I took and turned a bur on a razor blade against the edge of a pan saw table. That's cast iron and that makes a sharp little brewer turned upwards and I marked it with tape.
So I know what side to scrape towards. You can grab this and just keep. Gentle touch, but firm and you'll be able to scrape out these marks. If you're a patient, you'll get those marks out. You'll see the young grain and that's what Martin did.
Joe Etgen: These lines this way. That's the wood grain. So we're trying to remove these horizontal lines from the drum sander. When I started this project, I knew I was going to be doing a lot of sanding, but I didn't realize how much scraping I'd be doing too. Penciling a couple marks here on the edge. Actually going to run this up the fingerboard, just need to take a little bit off there.
Final filing and sanding
Check it for straightness too. It's looking pretty good. There's a few strokes with this to take out these filing marks [on-screen text reads: stewmac.com - 3M Gold Fre-Cut Sandpaper. You don't want to wrap this all the way around because we're going to round the edge of the fret board later on. All right, now that we got all this sanded down to 220, on the back of the neck and the headstock here.
We're going to raise the grain a little bit with Behkol [on-screen text reads: stewmac.com - Behlen Behkol Solvent]. It's going to rub this on here and what this does is it cleans off the wood. You can see that, raises the wood grains, cleans out the pores, and brings up any piece of wood grain up to the surface that hasn't been sanded. We're probably going to raise the grain a couple times.
Dan Erlewine: Got it?
Joe Etgen: Yeah, I got it final sanded here. And the razor blade trick really helped remove those scratches from the drum sander from the cross grain. Really smoothed out the end grain really on the headstock here.
Dan Erlewine: I'm afraid to touch it. You got to keep your hands really clean at this stage. I like your diamond. It's a little harder than the Martin we're looking at, but I like that. It's kind of your own style. It'll really pop out with lacker on it and stain. And you're really even going along the length of the neck.
Joe Etgen: I used a straight edge to try to gauge that.
Dan Erlewine: Before we started, we made a set of calls off the Martin neck and they didn't fit this neck and they're doing pretty well right now. Now they're sitting down so you can check the curve back then they wouldn't bottom on the curve because it was too much meat there. It was a baseball beat. It's perfect, just like that old 00-42 that we're looking at. Let's get you back to work. Once you get that fit to the body, you can put a finish on it.
Joe Etgen: Yeah.


