Cleaning up after sloppy fretwork: fixing chips in the fingerboard
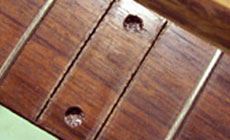
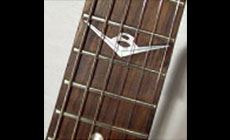
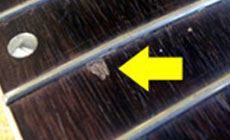
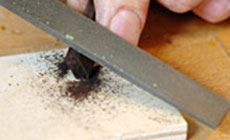
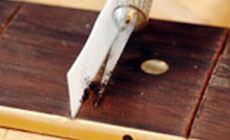
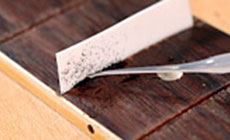
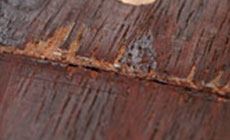
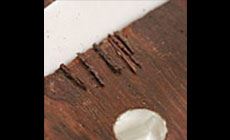
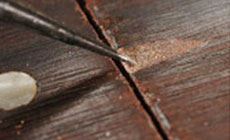
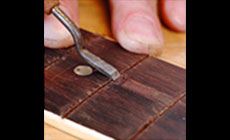
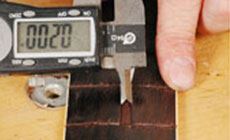
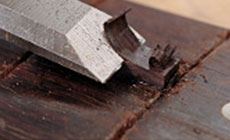
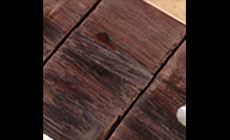
As if a broken peghead and truss rod trouble wasn’t enough, a sloppy refret job left this neck with deep chips at the fret slots. Here’s how to hide the scars leftover from a bad fret job. Luckily for the guitar, its owner isn’t ready to throw it in the trash heap just yet. All these peghead breaks made a mess of the truss rod, so this repair meant replacing that, too. Replacing the truss rod meant removing the fingerboard, and while I’m at it the frets need replacing. Removing the frets, I noticed the condition of the fingerboard itself: it’s got a lot of nasty chips. I think this guitar’s the victim of a reckless repairman. Whoever refretted this neck probably didn’t heat the frets before yanking them out (heat reduces this chipping). Maybe they were worried about igniting the plastic binding. This chipped-up board wasn’t something I expected when my customer shipped me the peghead repair! But it’s a good opportunity to show some ways to fix fretboard chips. The smaller chips like the one above are partly hidden by the fret crown. They’re easy to fix. The first step is to create some filing dust from a scrap of rosewood. Pack the dust into the fretboard chip with an X-Acto knife or a micro chisel. A piece of Teflon creates a dam that fills the slot and keeps it clean through the whole operation. Over the years I’ve tried a number of things to dam up the slot this way, but this Teflon works the best by far. We’ve made it available in our catalog now: To reduce chipping, heat the fret with a soldering iron before you pull it. We tried all sorts of materials to fill a fret slot while fixing chips. The best by far is our new Teflon Fret Dam. It’s sized to fit fret slots, cuts easily, and a whole sheet costs very little. After packing rosewood dust into the chip, I hit it with a small amount of thin super glue followed by a dab of accelerator. This fills the chip with a solid patch that blends with the rosewood fingerboard. Here are some severe chips that run further out into the area between frets. In this situation, I like to take a piece of rosewood that’s similar in color and chip off tiny slivers to use as filler strips. I’ll carefully inlay the small slivers into the chips, so I'm actually re-filling the damaged spots with rosewood. I'll hit them with thin super glue and a dash of accelerator. After gluing, sanding the chips makes them disappear. This big chip had been partially filled with sawdust and wood glue, but not enough to level it, and the result looked awful. My plan here is to cut out the damaged area all the way from one fret slot to the next, then inlay a replacement strip of rosewood. With an X-Acto knife and a straightedge, score the area to be removed. Then use a micro chisel to remove the damaged wood, creating a trench for inlaying new wood I then measure the trench with a caliper and cut a scrap of matching rosewood to size — a perfect fit! I used thin super glue and accelerator to glue the block in place, with Teflon filling both slots. Finally I chiseled the block down until until it was almost level with the board, then switched to my shaping file to make it flush. After it's sanded and the frets go in, the resulting patch will be just about invisible. Check this out! Repairman Chris Hosner of Waynesburg KY chiseled out the 12th-fret inlays and wood on a Gretsch Syncromatic. He pieced in new wood, then used a Dremel tool and router base to create a custom 12th-fret inlay on his guitar, “Lady Luck.” Sweet! The last steps of my fretboard repairs, and to Chris' custom job, is to level any high fills or inlays with a needle file before sanding the entire board with a radius block. This smooths and blends all the new work with the rest of the board. It’s a ton of work, but the result is like having a new fingerboard!Oh, my achin’ neck!

With a peghead that’s been fractured at least a couple of times, this poor Les Paul has seen better days.

One thing led to another... and another...
For small chips, use rosewood dust
Hot tip!
Check It Out!
Teflon’s the best thing yet.
For medium chips: rosewood slivers
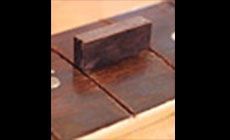
For big nasty chips: dig a trench!

Believe it or not, you might want to do this whole “trenching” process for fun.