How Boogie Fever led to a Neck Transplant
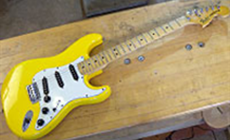
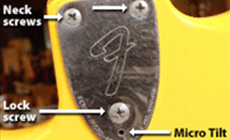
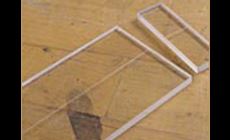
A TV show from 30 years ago led me to do a neck transplant on this Strat All because my buddy Andrew still has a case of boogie fever! With his face glued to the screen, he saw a guitar that made a lasting impression: a Strat with a large peghead on a maple neck. The body was glossy black, with a black pickguard and black knobs. That was the coolest guitar ever, as far as young Andrew was concerned, and it stuck in his mind forever. You know how that is. He got a good price on it, but it’s certainly not black: it’s a super-bright Monaco Yellow, from Fender’s short-lived “International Colors” series of the 1980s. That yellow is no-go with Andrew. He still wants the black guitar from Soul Train, so he talked to me about stripping this body and repainting it black. It’s not as collectable as a 50s Strat, but this guitar is intact and original. It’s made it this far in great shape, so I convinced Andrew not to alter it. We agreed to leave the body and electronics as-is, transplanting the neck to a new body with a Golden Age prewired pickguard. We’ll transfer the original hardware to the new body. Just a matter of following the bolt-on neck instructions in the Free Info pages of our website. But this one’s not quite that simple. This guitar uses the “Tilt Neck Micro Adjustment” common to Fenders of its era: a 3 bolt attachment scheme with a small Allen screw for micro-adjusting the neck angle Hmmm... This makes things a bit more complicated. Instead of the usual 4 mounting bolts, the Micro-Adjust uses just 2, plus a larger machine screw that locks the neck tilt. Also a small Allen screw adjuster. Metal inserts in the body and the neck make up the threaded anchor and strike plate of the mechanism. I’ll need to drill the new body to accept all this hardware, and the holes have to be placed very precisely. The 1970s Monaco Yellow body weighed as much as a heavy Les Paul. We wanted a lighter replacement body, and found one at just over 3.5 lbs. When you order a body from StewMac, you can call in a special pick telling us the weight range you’re trying to hit. My pals on the tech team will hand pick one that’s as close as possible to your request. To exactly duplicate the mounting hole locations on the new body, I made a template from a piece of acrylic.
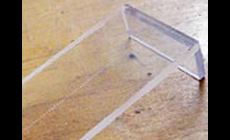
After scribing a centerline, I cut off the last inch and used binding glue to join the two pieces in an L shape. I made the acrylic piece long enough for two cam clamps to hold it securely to the body. I lined up the centerline exactly over the middle hole by putting a snug-fitting brad point drill bit in the hole. The drill’s center point clearly showed when my scribed centerline was lined up. I used brad point bits to scribe all four hole locations on the acrylic. Then I removed the template and drilled the holes in it using a 1/8" brad point bit.A trickier-than-usual operation

My friend Andrew grew up watching Soul Train in the 70s.

Fast-forward 30-plus years: Andrew’s finally found his Strat.
What?! You want to paint over this oddball piece of Fender history?
Sounds like an easy neck-swap, right?
Here’s a tip: this body’s a StewMac special pick

Make a template to transfer the mounting holes to the new body
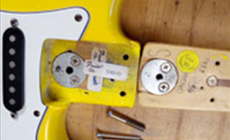
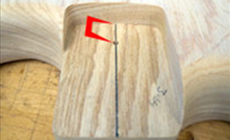
The distance from the back of the neck pocket to the center of the lock screw is crucial for getting proper placement. I measured the original here...
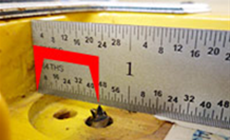
...then marked the same point on the new body. I made a centerline on this body first, which I’ll need for aligning the template in the next step. With a drill press, I made a 1/8" hole for a temporary indexing pin.
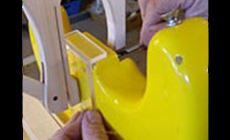
I shortened the template to fit the neck pocket, installed a 1/8" index pin and mounted the template. After matching up the centerline, I marked the rest of the holes with the 1/8" brad point bit.
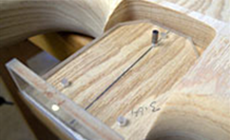
Keep in mind that the side of the template that was face down on the body, and on which the hole positions were scribed, will now be face up when marking these holes onto the new body.
Finally it’s time to drill the mounting holes.
The two standard neck screw holes and the Micro Adjuster hole are 3/16". The shallow recess for the Micro Adjust hardware required a 1-1/4" Forstner bit. In the center of the recess, I drilled a 1/4" hole for the lock screw.
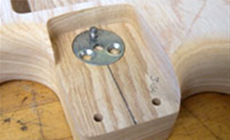
Whew! A perfect fit!
After test-mounting the neck, I drilled holes for the hardware and pickguard, following the Locating The Bridge section of our online Electric Guitar and Bass Assembly Guide. With all the holes drilled it's time to apply a finish!

Making it look the part:
I mixed a gloss black nitrocellulose lacquer using ColorTone pigments. It made this body a dead ringer for the one teenage Andrew got hooked on. I followed our online finishing schedule for the spraying.

From here on, it was easy to slap the whole thing back together and deliver it to Andrew. Boogie on, Dude!


