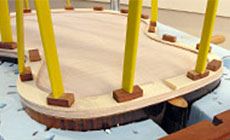
Keep that body in shape! Go-bar/neck jig gluing rig.
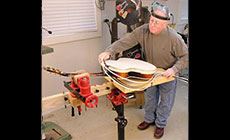
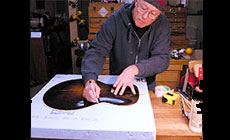
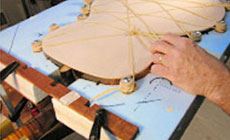
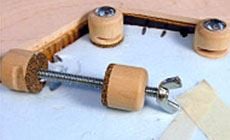
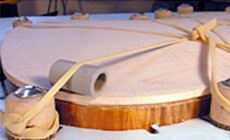
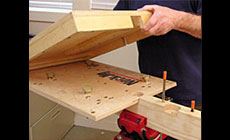
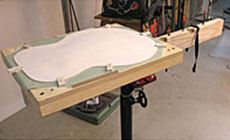
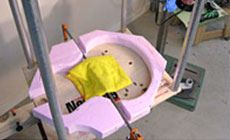
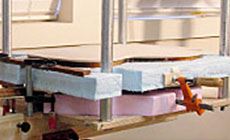
This 1928 Gibson archtop came into my shop last year with a major back problem. It wasn’t a quick fix. In fact, the guitar settled in for a long stay And somebody glued it unevenly with epoxy. The result was a rock-hard mess with gaps between it and the body. Once this back came off, there was no way it was fitting back on again. So I had two problems: 1. I needed to carve a new arched back. 2. What’s to keep the body from getting out of shape while the back is off being replicated? Popping the back off those 80-year-old wooden sides is like taking the top off an oatmeal box: there's no longer anything to keep that box from twisting out of shape. The first problem was solved with the help of a good friend: Bill Collings of Collings Guitars agreed to carve the back for me. Man, am I in luck. Nobody could carve this better! To solve the body-shape problem, I headed to the home improvement store. I picked up some of the expensive blue insulation board (closed-cell polystyrene foam) and I traced the guitar back onto it. Then I shipped the back to Bill. Cutting the shape on the bandsaw gave me a mold to hold the body shape for the six months wait while the new back is being carved. That’s a long time to expect the open guitar sides to remain stable, but this trick worked! When the back arrived, the guitar was as ready as on the day I put it in the mold. During the waiting period, I repaired and replaced all the old side kerfing (rotted and moldy). I wanted to keep the guitar in the mold until the new back was glued on. So I needed a clamping method that would work with my foam mold in place. It might be perfect for something you’re working on, though. Spool clamps are made for clamping backs like this, but with the mold around the body, installing them took too long. My hot glue could get cold before I got the clamps on. I put spool clamps through the mold around the body, and cut a notch in each clamp. I can hook rubber binding bands on these notches. Stretching the bands over these posts is a super-fast way to create clamping power. A scrap of plastic tubing inserted under the bands added to the downward pressure over the side joint, but it still wasn’t enough clamping power for this particular back. I needed another solution. We have a storehouse of instructions, how-to articles, frequently asked questions and stories about instrument building. There’s even a fret scale calculator for finding the proper fret locations for any neck. The Free information link is on every page of stewmac.com. My neck jig is mounted on a shopstand, and when there’s no fretwork going on, I put a plywood cover over the table end of the jig. This turns the neck jig into a killer workbench — it rotates and adjusts up and down. I even mount a repair vise on the neck jig beam. Looking at my plywood table on the jig gave me an idea: I could use that plywood piece as the top of a go-bar clamping system, right on the neck jig. With the jig held in the angle vise on my shopstand, I’d have a revolving, height-adjustable go-bar deck! The outer edge of the guitar rests on the pink foam, and makes room for a bar clamp that’s holding the blue foam body mold snug at the waist. There wasn’t much time for snapping photos once I had wet hot glue applied — about 2-3 minutes to get clamped up. I warmed my work area up with a space heater to extend the clamping time. Wooden cauls positioned around the rim of the guitar spread the pressure of the go-bars. With my go-bar parts packed away, my neck jig workbench is back to normal, with the repair vise mounted to the beam of the jig. This compact, rotating bench gives me access from all angles for jobs like fitting the new back binding.How I avoided backside troubles: Keep that body in shape!
This guitar back was split down the middle and caved in.

Experiment
Here’s an idea I tried and rejected.
Here’s the twist:
Have you found the free tech help at stewmac.com?
Now for the go-bars
This worked great!