Do-It-Yourself Resophonic Guitar, Part 3: Final Assembly
Al Rorick guides you through constructing a 1920's National Triolian-syle resophonic guitar while saving time and money.
Part Three: Final Assembly
IN THIS ARTICLE
| • Align the neck and body • Make and install the soundwell • Cut the F-holes |
• Fit and square the neck • Glue and fit the back braces • Install the support posts |
Putting it all together
Here in Part Three, Al's resophonic guitar finally takes shape:
Before final-fitting the neck and installing the soundwell, you can inlay and fret the neck using your preferred method. I saved the fretting until last, so I could make slight adjustments in string action and neck angle by "truing" the fretboard with the neck on the body. I used the Erlewine Neck Jig for maximum accuracy.
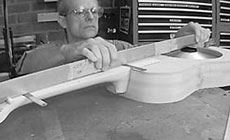
Align the neck and body
Neck alignment should be done before cutting the soundwell hole. Lightly pencil a centerline on the guitar top, using a straightedge aligned where the guitar sides meet at the neck block and tailblock. Mark the center of the soundhole at a point approximately 13" from the front edge of the body at the neck block end. Perpendicular to this location, make marks at 1-1/4", 1-1/2", and 1-3/4" intervals. These marks will help you align the neck laterally.
Put the neck in the body, press the heel tightly against the shoulders, and clamp the fretboard extension firmly to the top. Place a long straightedge on each side of the fretboard. Compare the straightedge positions to the alignment marks; shift the neck stick inside the guitar until the straightedges are equidistant from the centerline. When the straightedges are in position, make two marks on the top at the butt end as an alignment reference (because any marks made in the soundhole area will soon be removed along with the hole section that we cut away).

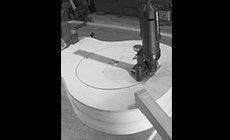
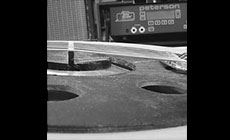
Cut the top's soundhole
From the center of the 12th fret position, carefully measure 12-5/8" down the body centerline and make a markûthis is the location of the saddle and the center of the soundwell. Although the saddle of the 1929 National I copied was located at 25" (the exact scale length), my saddle location is 25-1/8" from the nut. The extra 1/8" is for string length compensation and improved intonation.
Installing the soundwell involves laying out and cutting the soundhole, the well sidewall, and the bottom of the well. Since plywoods vary in thickness, you should adjust my measurements to suit the wood you're using. The bottom of the soundwell—where the cone rests—should be 1-1/16" from the top surface of the guitar.
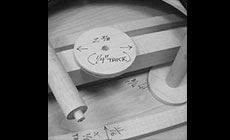
I drilled a 1/4" hole at the 12-5/8" mark, as a center for a Dremel tool fastened to a homemade 'swing arm'. Using our 1/8" Carbide Downcut Inlay Router Bit, I cut the 9-5/8" diameter soundwell hole in several 1/16"-deep passes. The swing arm is longer than the hole's diameter, so the arm won't fall into the body when the hole is cut. You could also lay out the hole with a compass and cut it with a handheld electric jigsaw.
Make the soundwell
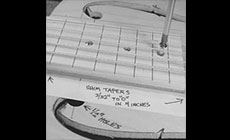
Cut the soundwell's sidewall from an 11" x 11" x 7/8" piece of wood (I used mahogany), or a 7/8" wood laminate. The well's inside measurement should be 9-5/8"; the outside diameter is your choice. My wall was 1/2" thick, so the outside measured 10-5/8". The old National's wall was 3/4" thick. Regardless of the thickness you choose, the sidewall should be 7/8" in height.
The bottom of the well is 1/4" plywood or hardwood (the latter is preferred). The well bottom's inner diameter is 9", for cone support, and the outside diameter matches the wall's 10-5/8" diameter (or other nominal diameter). Because the soundwell is 9-5/8", the 9-1/2" diameter cone fits through the hole easily, has room to spread out under string pressure, and can be moved slightly in all directions for string-to-neck alignment and intonation adjustment.

Install the soundwell
Glue the well sides and bottom together. If you align the splits made as the band-saw entered the inside of the circle, you'll have a little flex when gluing the well to the top; if you overlap them, the wall is probably a little stronger. If you keep the split, don't glue it on the centerline, because two mounting screws fasten the well to the stick on the centerline. Glue the well to the top, aligning the inner diameters.
Cut the F-holes
Drill two sets of 1/2" holes, aligned as in the drawing, and use the full-size F-hole template for the shape. I routed the F-holes with a 1/8" downcut carbide bit in three passes, and then used a trimmed razor saw blade to finish the tight curve and the square lip.

Fit the neck
Install the nut temporarily with a dab of superglue, and cut notches for the two outside E-strings at the desired spacing and approximate depth (you'll install the strings later). I stacked feeler gauges at the 1st and 12th frets to simulate the fret height. The string gauge should suit the player's style. I prefer .016" to .054" strings, for a reasonably stiff bottleneck action.
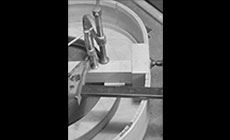
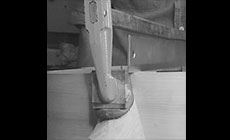
Put the neck in the body. The neck stick should contact the well bottom in two places, but without any force which might distort the top or the sides. You may need to trim or shim the stick where it contacts the well. I needed a .155" wood shim toward the butt end to avoid flexing the top. Check the top's flatness frequently with a long straightedge. With the stick snugged up, check the neck's lateral alignment to the two marks made earlier on the butt end of the guitar, realign if necessary, and clamp it in place temporarily. Mark the stick's location on the tailblock.
Put a clamp on the neck stick, then with a second clamp, clamp the first one to pull the stick, and in particular the neck's heel where it joins the body snug, but the stick shouldn't touch the block.
Clamp the stick to the well, in alignment with the pencil marks on the tailblock. Turn the guitar over and drill two clearance holes through the bottom of the well (and the shim, if present) for the wood-screws which fasten the well to the stick.
The screws must be countersunk, but this can be tricky in brittle plywood. Use a drill bit that matches the screw head's width, hold back on the drill a little, and finish countersinking with the drill bit running in reverse. When the screws are installed, the neck and body will be attached together firmly.
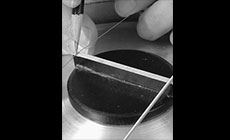
Screw the biscuit to the cone and place it in the well. Hold the tailpiece lightly in place with a padded clamp. Install the two E-strings and tune them lightly until taut.
At the saddle, space the two stings 2-1/4" apart, on center, and lightly notch them in place. Double-check the neck's lateral alignment by comparing the two strings to the edge of the fretboard, and be sure the strings have equal angles from the tailpiece to the saddle (move the tailpiece in either direction if necessary). Drill the tailpiece mounting holes and screw it on. The remaining strings should be located in shallow notches; the string slots will be filed to their final depths later.
Apply moderate downward pressure on the biscuit and lay a long straightedge from the nut to the top of the saddle. This will give you a rough idea of the amount of saddle to be trimmed for a playable string action. Since my neck was as yet unfretted, I stacked up feeler gauges again to simulate fret height. Any measurement of string action is also related to the saddle clearance under the coverplate (if you use a metal coverplate).
Make the coverplate and clearance
The coverplate is simply a 10-1/2" circle of 1/8" thick masonite—I couldn't find hard glossy tempered masonite, so I used the lumberyard variety. I cut the coverplate's outer diameter concentrically by drilling a 1/4" center hole, and using the same Dremel swing-arm technique used for cutting the top's soundhole. Eight 1-1/4" diameter soundholes are spaced equally around the circle and were drilled with a sharp spade-bit. The 3-7/8" diameter center hole was cut with a hand-held jigsaw, then scraped and sanded smooth. One nice thing about my coverplate is that I can make setup adjustments with the cover in place since it has no handrest.
Also, the thickness of the coverplate raises the tailpiece up and 'unloads' the cone just about right—too much down-pressure on the cone is not good, and too little is not good.
Square-up the neck and endblock
I glued on the back with the strings on, and at pitch. Therefore, I needed a long bar clamp on the the neck heel and at the butt end of the guitar (both protected by cauls) to pull the flat gluing surfaces of the neck block and end block in line until a straightedge would rest on them (string tension was pulling the body open, and the blocks out of square).
Next, I tightened a C-clamp on the stick and wedged a prop against it, to force the neck block and the shoulders tightly against the neck heel. Then I glued on the back. (Once dry, the back held the shoulders in position, and the C-clamp and prop were removed).
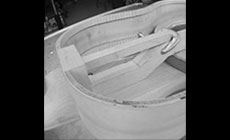
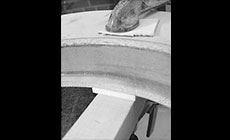
Glue and fit the back braces
The back has two hard maple braces measuring 11/16" wide x 1/2" deep, as in the layout above. Glue them on slightly oversize and trim them carefully, matching their ends to the slight curve of the kerfed lining. Ideally, the back should drop into place with the ends of the braces butted against the kerfing because it adds end-to-end stiffness and strength. A tight fit here will help the body hold its shape. Leave the back about 1/4" oversize, so you can trim it flush to the sides with a ball-bearing router bit after the glue has dried.

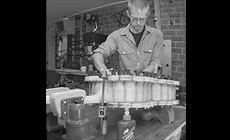
Glue the back using spool clamps, with bar clamps and cauls on each endblock. I used Franklin Liquid Hide Glue for all the assembly, because it gave me plenty of time to align the parts before clamping, and I also believe it adds to a 'vintage' tone. Hide glue joints should dry at least overnight. Next day, remove the strings, the cone, the C-clamp and neck prop, and then rout off the excess back overhang. A homemade router table and a ball-bearing bit made the job easy.
Install the support ports
Install two dowel-stick supports centered under the stick close to the front and rear edge of the soundwell bottom, although not directly under it. Each support post is 1" forward from the inner lip of the well bottom. Wedge these in until they fit snugly, but don't glue them yet. Let the guitar settle for a week or two before making such final adjustments as lowering the saddle, final-cutting the string slots, and gluing the supports in. Leave the action on the high side during this 'settle-in' period.
Shim the fretboard
The fretboard extension over the body will be raised because of the neck angle, therefore you'll need to cut a thin 4" shim, from 3/32" to 0", to fill that void (the old National had a shim, too). Install the fretboard screws through clearance holes in the fretboard and the top, and into the neck stick (you will be disassembling the fretboard and neck when you apply the finish).
Before finishing, install all six stings and fine-tune your action by adjusting the height of the nut slots and saddle slots to suit your taste and style. Reassemble the guitar without the coverplate to permit unhindered saddle and action adjustment, and so the cone can be moved slightly if needed.
When satisfied with your setup, remove the strings, put on the coverplate (the metal coverplate's single 'diamond' hole-pattern points toward the neck), restring the guitar and align the cone one final time. Then align the coverplate concentric to the biscuit, tape it in place, and centerpunch the holes that fasten the plate to the top. Don't drill these holes until after a finish has been applied to the instrument.
Remove all the hardware and the neck, final-sand everything, and you're ready for finishing, then a final action adjustment to suit your style.
More In This Series
| Introduction | Do-It-Yourself Resophonic Guitar |
| Part One | Constructing the Body |
| Part Two | Making the neck |
| Part Three | Final assembly |